
Migrating from Azure AD B2C to External ID
Part 2: Migration Tools and Process
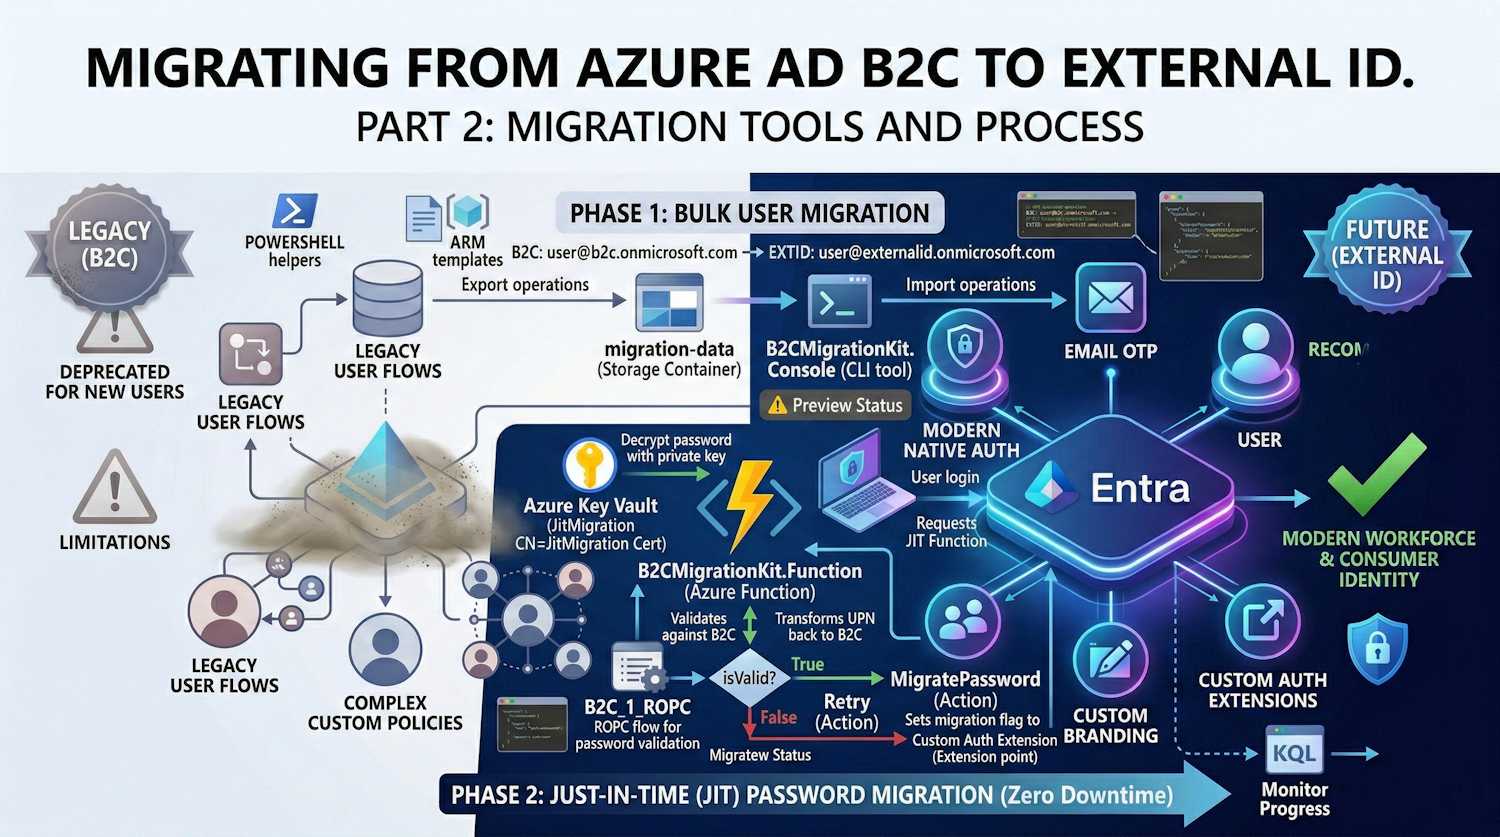
Microsoft put together an official B2C to External ID Migration Kit — a sample implementation built around the JIT password migration preview. This post covers the architecture, the tools involved, and the actual steps to run the migration.
Preview Status: The migration kit is a sample implementation showcasing the Just-In-Time password migration public preview. It's suitable for proof-of-concept and testing but may require additional security hardening for production deployments.
Migration Architecture Overview
The migration follows a two-phase approach that ensures zero downtime and smooth user experience:

Migration Kit Components
The toolkit consists of three main components:
| Component | Purpose |
|---|---|
| B2CMigrationKit.Console | CLI tool for bulk export and import operations |
| B2CMigrationKit.Function | Azure Function for JIT password migration |
| B2CMigrationKit.Core | Shared business logic and services |
Project Structure
B2CMigrationKit/
├── src/
│   ├── B2CMigrationKit.Core/           # Shared services
│   │   ├── Abstractions/               # Interfaces
│   │   ├── Configuration/              # Options classes
│   │   ├── Models/                     # User, results
│   │   └── Services/
│   │       ├── Infrastructure/         # Graph, Storage clients
│   │       └── Orchestrators/          # Export, Import, JIT
│   ├── B2CMigrationKit.Console/        # CLI application
│   └── B2CMigrationKit.Function/       # Azure Function
├── scripts/                            # PowerShell helpers
└── docs/                               # Architecture & Developer guides
Phase 1: Bulk User Migration
Step 1: Export Users from B2C
The export process reads all users from your B2C tenant and saves them to Azure Blob Storage:
# Run export operation
B2CMigrationKit.Console export --config appsettings.json
Configuration (appsettings.json):
{
  "Migration": {
    "B2C": {
      "TenantId": "your-b2c-tenant-id",
      "TenantDomain": "yourb2c.onmicrosoft.com",
      "AppRegistration": {
        "ClientId": "b2c-app-client-id",
        "ClientSecret": "b2c-app-secret",
        "Enabled": true
      }
    },
    "Storage": {
      "ConnectionString": "UseDevelopmentStorage=true",
      "ContainerName": "migration-data"
    },
    "Export": {
      "SelectFields": "id,userPrincipalName,displayName,givenName,surname,mail,identities",
      "MaxUsers": 0
    }
  }
}
Export Output:
{
  "id": "00aa00aa-bb11-cc22-dd33-44ee44ee44ee",
  "userPrincipalName": "user@b2cprod.onmicrosoft.com",
  "displayName": "John Doe",
  "mail": "john.doe@example.com",
  "identities": [
    {
      "signInType": "emailAddress",
      "issuer": "b2cprod.onmicrosoft.com",
      "issuerAssignedId": "john.doe@example.com"
    }
  ]
}
Step 2: Import Users to External ID
The import process creates users in External ID with:
- Transformed UPN - Domain changed to External ID tenant
- Placeholder password - Random strong password (replaced during JIT)
- Migration flag -
extension_{appId}_RequireMigration = true - B2C ObjectId - Preserved for correlation
# Run import operation
B2CMigrationKit.Console import --config appsettings.json
Configuration additions:
{
  "Migration": {
    "ExternalId": {
      "TenantId": "your-external-id-tenant-id",
      "TenantDomain": "yourexternalid.onmicrosoft.com",
      "ExtensionAppId": "00000000000000000000000000000000",
      "AppRegistration": {
        "ClientId": "external-id-app-client-id",
        "ClientSecret": "external-id-app-secret",
        "Enabled": true
      }
    },
    "Import": {
      "MigrationAttributes": {
        "StoreB2CObjectId": true,
        "SetRequireMigration": true
      }
    }
  }
}
UPN Transformation:
The import orchestrator transforms UPNs to work with External ID:
B2C:         user@b2cprod.onmicrosoft.com
External ID: user@externalid.onmicrosoft.com
This preserves the local part (username) as a unique identifier, enabling the JIT migration to map back to B2C for password validation.
Phase 2: Just-In-Time Password Migration
The JIT piece is really what makes this migration painless — users sign in to External ID and their password gets migrated on the spot, without any password reset required.
How JIT Works

Step 2: Create the encryption certificate
# Create self-signed certificate:
#   Name: JitMigrationEncryptionCert
#   Subject: CN=JitMigration
#   Key Type: RSA
#   Key Size: 2048 or 4096
3. Deploy the Azure Function
The JIT function handles the password validation:
[FunctionName("JitMigrationEndpoint")]
public static async Task<IActionResult> Run(
    [HttpTrigger(AuthorizationLevel.Anonymous, "post")] HttpRequest req,
    ILogger log)
{
    // 1. Parse request from External ID
    var payload = await ParseRequestAsync(req, log);

    // 2. Decrypt password using private key from Key Vault
    var (password, nonce) = await DecryptPasswordAsync(
        payload.EncryptedPasswordContext, log);

    // 3. Transform UPN back to B2C format
    string b2cUpn = TransformUpnForB2C(payload.UserPrincipalName);
    // user@externalid.onmicrosoft.com → user@b2c.onmicrosoft.com

    // 4. Validate against B2C using ROPC
    var isValid = await ValidateWithB2CAsync(b2cUpn, password);

    // 5. Return appropriate action
    if (isValid)
    {
        return new OkObjectResult(new {
            data = new {
                actions = new[] {
                    new { type = "microsoft.graph.passwordSubmit.MigratePassword" }
                },
                nonce = nonce
            }
        });
    }
    else
    {
        return new OkObjectResult(new {
            data = new {
                actions = new[] {
                    new { type = "microsoft.graph.passwordSubmit.Retry" }
                },
                nonce = nonce
            }
        });
    }
}
4. Configure Custom Authentication Extension
Create the extension in External ID:
POST https://graph.microsoft.com/beta/identity/customAuthenticationExtensions

{
    "@odata.type": "#microsoft.graph.onPasswordSubmitCustomExtension",
    "displayName": "JIT Password Migration",
    "description": "Validates credentials against B2C during migration",
    "endpointConfiguration": {
        "@odata.type": "#microsoft.graph.httpRequestEndpoint",
        "targetUrl": "https://your-function.azurewebsites.net/api/JitMigration"
    },
    "authenticationConfiguration": {
        "@odata.type": "#microsoft.graph.azureAdTokenAuthentication",
        "resourceId": "api://your-function.azurewebsites.net/{app-id}"
    }
}
5. Create Event Listener
Link the extension to your application:
POST https://graph.microsoft.com/beta/identity/authenticationEventListeners

{
    "@odata.type": "#microsoft.graph.onPasswordSubmitListener",
    "conditions": {
        "applications": {
            "includeAllApplications": false,
            "includeApplications": [
                { "appId": "your-app-client-id" }
            ]
        }
    },
    "priority": 500,
    "handler": {
        "@odata.type": "#microsoft.graph.onPasswordMigrationCustomExtensionHandler",
        "migrationPropertyId": "extension_00000000_RequireMigration",
        "customExtension": {
            "id": "custom-extension-id"
        }
    }
}
Response Actions
The JIT function can return four actions:
| Action | When to Use |
|---|---|
MigratePassword |
Password valid - External ID stores it and sets flag to false |
UpdatePassword |
Password valid but weak - routes user to password reset |
Retry |
Password invalid - user can try again |
Block |
Authentication blocked (e.g., account locked in B2C) |
Attribute Mapping
Configure how attributes are mapped between B2C and External ID:
{
  "Import": {
    "AttributeMappings": {
      "extension_b2c_CustomerId": "extension_extid_LegacyUserId",
      "extension_b2c_MembershipLevel": "extension_extid_Tier"
    },
    "ExcludeFields": [
      "createdDateTime",
      "lastPasswordChangeDateTime"
    ]
  }
}
Migration Checklist
Pre-Migration
- Create External ID tenant
- Register app in B2C with Graph permissions
(
User.Read.All) - Register app in External ID with Graph
permissions (
User.ReadWrite.All,Directory.ReadWrite.All) - Create extension attributes in External ID
- Set up Azure Key Vault with encryption certificate
- Deploy JIT Azure Function
- Configure B2C ROPC policy for JIT validation
During Migration
- Run bulk export from B2C
- Validate exported data
- Run bulk import to External ID
- Configure Custom Authentication Extension
- Create Event Listener
- Test with subset of users
Post-Migration
- Monitor JIT function logs
- Track migration progress (RequireMigration flag)
- Update application endpoints to External ID
- Decommission B2C tenant after migration complete
Monitoring Progress
Track migration status with KQL:
// Users still requiring migration
externalid_users
| where extension_RequireMigration == true
| summarize PendingMigration = count()

// Migration completion over time
SigninLogs
| where TimeGenerated > ago(30d)
| where AppDisplayName == "Your App"
| summarize MigratedUsers = dcount(UserId) by bin(TimeGenerated, 1d)
Troubleshooting
Common Issues
| Issue | Cause | Solution |
|---|---|---|
| ROPC fails in JIT | B2C ROPC policy missing | Create B2C_1_ROPC policy |
| UPN mismatch | Domain not transformed | Check TransformUpnForB2C() logic |
| Extension attr not found | Wrong ExtensionAppId | Use b2c-extensions-app ID without hyphens |
| Certificate error | Key Vault access | Enable Managed Identity, grant Get permission |
What's Next
- Part 1: Introduction to External ID - Features and comparison with B2C
- Part 3: Future of External ID - Roadmap, best practices, and recommendations
Resources
- B2C to External ID Migration Kit
- JIT Password Migration Documentation
- Architecture Guide
- Developer Guide
← Part 1 - Introduction | Part 3 - Future and Best Practices →