
Series Navigation
📍 You are here: Part 3 - ID Protection-Based Approvals Fundamentals
This is the third post in a detailed 4-part series on Microsoft Entra ID Governance:
- Part 1: Entitlement Management Fundamentals - Core concepts, architecture, and practical implementation scenarios
- Part 2: Advanced Entitlement Management & AI Agent Governance - Privileged access management, managing AI agents at scale, and advanced implementation patterns
- Part 3: ID Protection-Based Approvals Fundamentals (This post) - Securing access requests with risk intelligence and approval workflows
- Part 4: Protecting AI Agents with ID Protection - Detailed walkthrough of monitoring and securing autonomous agents with risk-based controls
Introduction
Welcome to Part 3 of our walkthrough of Microsoft Entra ID Governance. In Parts 1 and 2, we covered entitlement management—the foundation of modern access governance. You learned how to create access packages, implement policies, manage privileged access, and even govern AI agents at scale.
But here's the problem we haven't fully solved yet: What happens when a compromised account requests access?
Think about it. Your entitlement management system is beautifully designed. Self-service access requests. Approval workflows. Automatic expiration. Everything works perfectly—for legitimate users. But what if a user's account has been compromised by an attacker? What if their credentials were stolen in a phishing campaign? What if malware on their device is making access requests on their behalf?
Without risk intelligence, your approval workflow doesn't know the difference between "Alice the employee legitimately needs access to the Finance database for her project" and "Attacker using Alice's stolen credentials is trying to access the Finance database to steal customer credit card data."
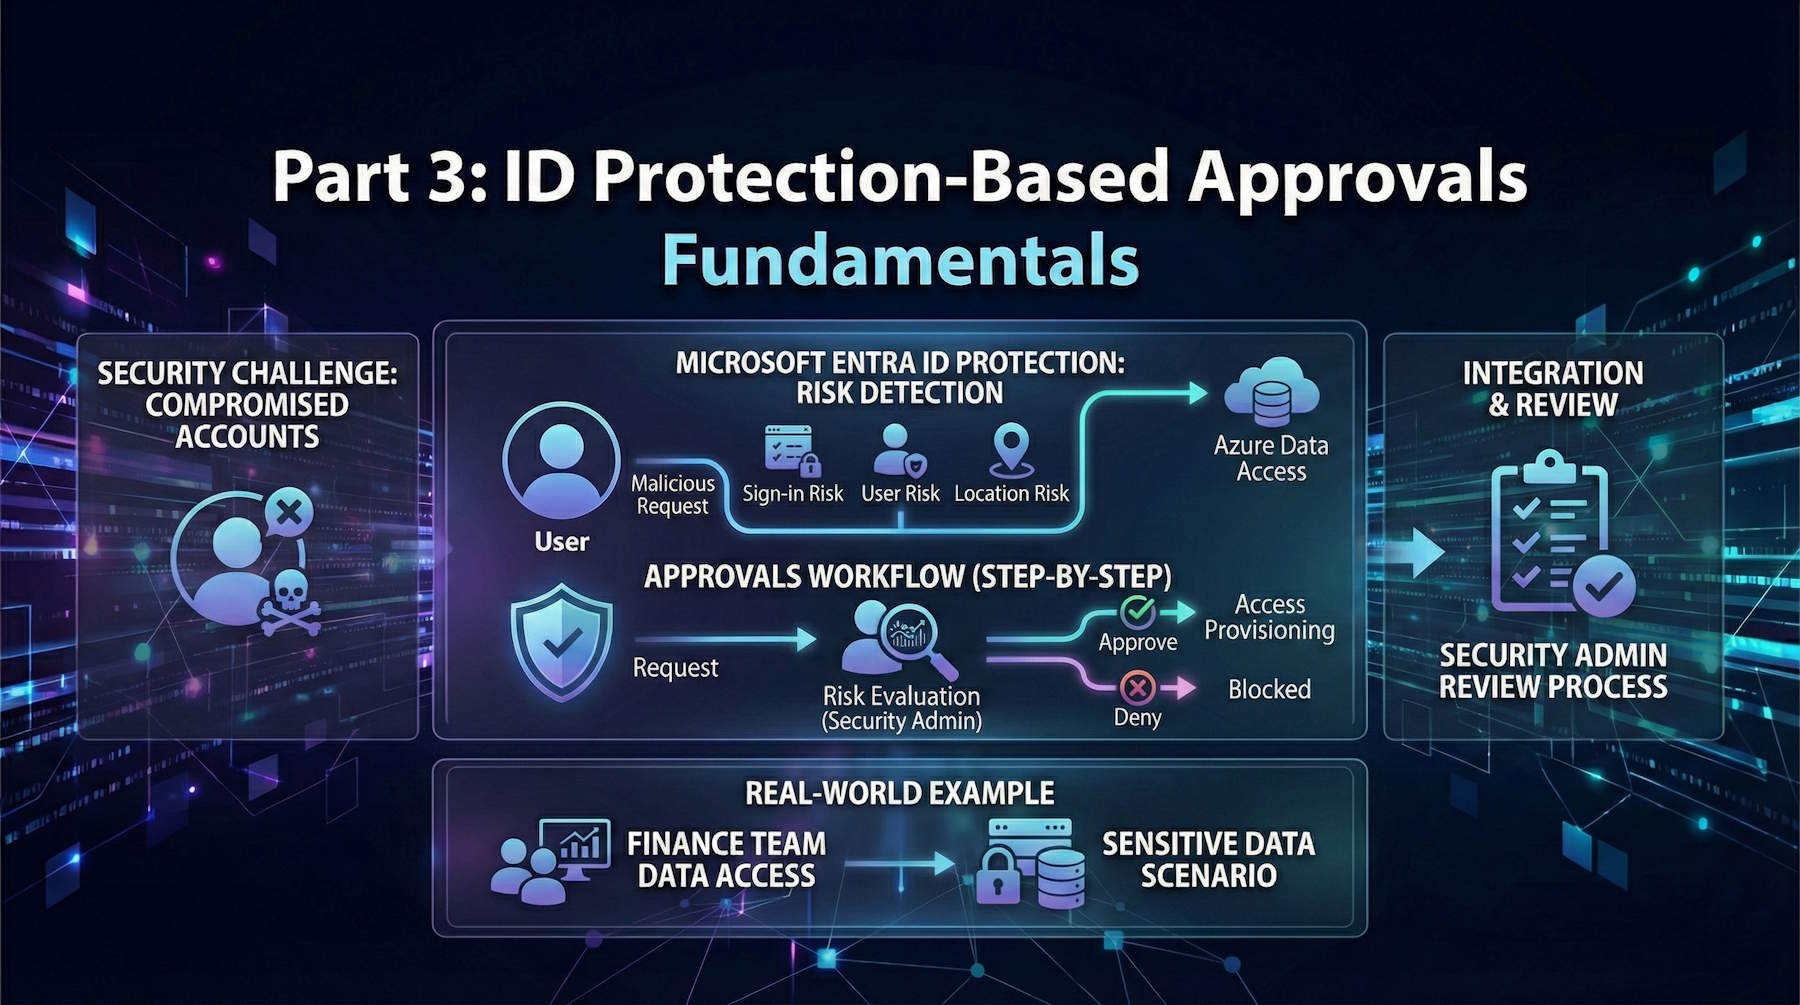
That's where Microsoft Entra ID Protection-based approvals come in. This feature adds a security intelligence layer to your access request workflows. When a user or agent flagged as risky requests access, the system automatically escalates it to your security team for additional scrutiny before normal approvals even begin.
In this post, we'll cover:
- Understanding the security challenge of compromised accounts in access workflows
- What Microsoft Entra ID Protection is and how it detects risk
- How to configure ID Protection-based approvals
- The Security Administrator's review process and decision framework
- Integrating with Azure data access scenarios
- Real-world examples of catching compromised accounts before they cause damage
Part 4 will dive deep into protecting AI agents specifically—because agents present unique challenges that deserve focused attention.
Let's start with why this matters.
Understanding the Security Challenge
The Access Request Vulnerability
Traditional entitlement management workflows assume that the identity requesting access is legitimate and in control of their account. However, in modern threat landscapes, this assumption is risky.
Account Compromise Scenarios:
Phishing Attack:
- User receives convincing phishing email mimicking Microsoft 365 login
- User enters credentials on fake login page
- Attacker now has valid credentials
- Attacker waits 24-48 hours for detection evasion
- Attacker uses stolen credentials to request access to sensitive data
Malware Infection:
- User's laptop infected with information-stealing malware
- Malware captures session tokens
- Attacker uses stolen tokens to impersonate user
- Attacker requests access to resources user doesn't normally need
Credential Stuffing:
- User reuses password across multiple sites
- One site gets breached, passwords leaked
- Attacker tests leaked passwords against your organization
- Successfully logs in with reused credentials
- Requests access to expand their reach
Session Hijacking:
- User on public WiFi without VPN
- Man-in-the-middle attack captures session
- Attacker hijacks active session
- Makes access requests before session expires
Insider Threat:
- Disgruntled employee planning to steal data
- Their behavior becomes unusual (accessing systems outside normal patterns)
- Requests access to data repositories they don't typically need
- Prepares to exfiltrate before resignation
Attack Objectives:
Once an attacker controls a compromised account, they attempt to:
- Request access to sensitive data repositories - Customer databases, financial records, intellectual property
- Escalate to administrative roles - Exchange Admin, Security Admin, Global Administrator
- Access resources that facilitate lateral movement - Jump servers, VPN access, administrative tools
- Reach data that can be monetized - Credit card numbers, personally identifiable information (PII), healthcare records
- Establish persistence for long-term compromise - Create backdoor accounts, deploy remote access tools
The Traditional Problem:
Without risk intelligence, your entitlement management system treats these scenarios the same as legitimate requests:
1. Compromised user submits access request
2. Request routes to manager who knows the user
3. Manager approves because "that's Alice, she's on my team"
4. Attacker gets access to sensitive resources
5. Damage occurs before compromise is detected
The manager can't see that Alice's account is compromised. The system can't see unusual patterns. Nobody realizes the request is malicious until it's too late.
The Solution: Risk-Based Approval Gates
Microsoft Entra ID Protection provides risk detection capabilities that identify compromised accounts and risky behaviors. By integrating these risk signals into entitlement management approval workflows, organizations can add an additional security gate.
Here's how it changes the scenario:
1. Compromised user submits access request
2. System detects user is flagged as Medium or High risk
3. Request automatically routes to Security Administrator (before manager approval)
4. Security Admin sees risk indicators and investigates
5. Security Admin denies request or investigates further
6. Compromise discovered and remediated before damage occurs
The key insight: Risk detection happens automatically, security review is required before access is granted.
This doesn't mean legitimate users are blocked. It means that when there's evidence of compromise or suspicious behavior, an expert reviews the request before approvals proceed.
What is Microsoft Entra ID Protection?
Overview
Microsoft Entra ID Protection is a security monitoring service that detects suspicious activities and potential identity compromises. It continuously analyzes sign-in patterns, impossible travel scenarios, malware indicators, and other risk factors to assign risk levels to user accounts and sign-in events.
Think of it as a constantly vigilant security analyst that never sleeps, watching every authentication attempt, comparing it against known attack patterns, and flagging anomalies that human analysts should investigate.
Risk Detection Methods
ID Protection uses multiple detection methods, combining Microsoft's global threat intelligence with machine learning models trained on billions of sign-in events.
Sign-in Risk Detections:
These are risks detected during the authentication process itself—indicators that this specific sign-in attempt might not be legitimate:
Anonymous IP Sign-ins:
- User signs in from a VPN, Tor node, or proxy service
- IP address is known to anonymize user's real location
- Common in attacks because attackers want to hide their location
- Example: User normally signs in from corporate network in New York, suddenly signing in from anonymous VPN in Eastern Europe
Atypical Travel:
- Impossible travel between geographic locations
- User signs in from Boston, then 2 hours later from London (physically impossible)
- Strong indicator of stolen credentials being used from different location
- Example: User authenticates from home office in Seattle at 9 AM, then again from IP address in Nigeria at 10 AM
Malware-Linked IP Addresses:
- IP address is known to host malware or be part of botnet
- Microsoft threat intelligence identifies IP as part of active attack infrastructure
- Example: Sign-in from IP address that Microsoft detected hosting credential-stealing malware
Unfamiliar Sign-in Properties:
- Unusual location, browser, device, or operating system
- User always signs in from Windows laptop, suddenly signs in from Linux machine
- User always uses Chrome, suddenly uses obscure browser
- Example: User who always authenticates from iPhone suddenly authenticates from Android tablet they don't own
Leaked Credentials:
- User's password was found in a credential dump or dark web breach database
- Microsoft monitors breach databases and matches against your users
- Password is confirmed to be compromised
- Example: User's password appears in a paste site or credential selling forum
Azure AD Threat Intelligence:
- Microsoft's threat intelligence detected patterns matching known attacks
- Based on data from Microsoft's global network (billions of sign-ins daily)
- Indicators of sophisticated attack techniques
- Example: Sign-in pattern matches tactics, techniques, and procedures (TTPs) of known threat actors
User Risk Detections:
These are risks associated with the user account itself, not a specific sign-in event:
Leaked Credentials (User Level):
- User's password confirmed in a breach
- Account is considered compromised until password reset
- Example: User's email and password found in credential dump from third-party service breach
Risky User Behaviors Cumulative:
- Multiple smaller risk indicators accumulating over time
- Pattern of suspicious activities that individually are minor but collectively concerning
- Example: User shows multiple unfamiliar sign-ins, unusual travel, new device registrations over several days
Mass Access to Sensitive Resources:
- User suddenly accessing large volumes of sensitive data
- Access pattern doesn't match normal job function
- Example: HR employee who normally accesses individual employee records suddenly downloads entire employee database
Password Spray Attacks:
- Account targeted in password spray attack
- Attacker tried common passwords against this specific account
- Example: Logs show 50+ failed authentication attempts with common passwords like "Winter2024!"
Anomalous Token Issuance:
- Unusual patterns in authentication token creation or usage
- Tokens issued from unexpected locations or conditions
- Example: Refresh tokens issued at unusual frequency or from locations that don't match user's pattern
Risk Levels
ID Protection assigns users and sign-in events to risk levels based on the confidence and severity of detected indicators:
Low Risk:
- Minimal suspicious indicators present
- Single minor anomaly detected
- Might be legitimate unusual behavior (user traveling, using new device)
- Standard approval process appropriate
- Example: User signs in from new coffee shop WiFi (unusual location but not impossible)
Medium Risk:
- Multiple suspicious indicators present
- Account shows signs of potential compromise
- Could be legitimate but warrants additional scrutiny
- Should trigger security review before granting sensitive access
- Example: User shows unfamiliar sign-in properties + atypical travel within 24 hours
High Risk:
- Strong indicators of account compromise
- Multiple detection types confirming risk
- Very likely the account is compromised
- Should not receive access without security investigation and remediation
- Example: User's leaked credentials detected + sign-in from malware-linked IP + impossible travel
The system updates risk levels in real-time as new events occur. A user might be Low risk in the morning, then jump to High risk after a suspicious sign-in from a malware-linked IP address at lunch.
How ID Protection-Based Approvals Work
The Enhanced Approval Workflow
When ID Protection-based approvals are configured, the access request workflow gains an additional security gate that activates based on the requester's risk level.
Standard Workflow (Without ID Protection):
Request Submitted → Policy Approver(s) → Access Assigned
Enhanced Workflow (With ID Protection):
Request Submitted → Risk Assessment → [If Risky] → Security Admin Review → [If Approved] → Policy Approver(s) → Access Assigned
The key difference: Risk assessment happens first, security review occurs before normal approvals.
Step-by-Step Process
Let's walk through exactly what happens when a user requests an access package:
Step 1: Request Submission
- User logs into My Access portal (https://myaccess.microsoft.com)
- Discovers available access package: "Finance Sensitive Data"
- Submits request with business justification: "Working on Q4 financial analysis project"
Step 2: Automatic Risk Evaluation
- Entitlement Management immediately queries Microsoft Entra ID Protection
- System retrieves user's current risk level (Low, Medium, or High)
- System retrieves most recent risk detections and details
- All of this happens automatically in milliseconds
Step 3: Risk Threshold Check
- Administrator previously configured risk thresholds
- Example configuration: "Route requests from Medium and High risk users to security review"
- System checks: Is user's risk level Medium or High?
- If NO → Request proceeds to normal policy approvers (manager, department head, etc.)
- If YES → Request routes to Security Administrator review FIRST
Step 4: Security Administrator Assignment
- Request automatically assigned to users with Security Administrator role
- Multiple Security Administrators can share the approval queue
- Notification sent via email and portal
- Request shows in Security Admin's "Pending Approvals" section
Step 5: Risk Details Presentation
- Security Administrator sees full context:
- User's identity and details
- User's current risk level (Medium or High)
- Specific risk detections (e.g., "Atypical travel detected 3 hours ago")
- Risk detection details (sign-in from unusual location, device info, timestamp)
- Access package being requested
- Resources included in package
- Business justification provided by user
- Normal policy approvers (who would approve after security review)
Step 6: Security Review Decision
The Security Administrator makes one of three decisions:
Option 1: Approve
- Security Admin reviews risk and determines it's acceptable
- Example: "User is traveling for business, travel was pre-announced, risk is false positive"
- Security Admin adds comment: "Approved - Confirmed legitimate business travel to London office"
- Request proceeds to normal policy approvers (manager, etc.)
- Manager sees Security Admin approval and comments
- If manager also approves, access is granted
Option 2: Deny
- Security Admin determines risk is too high or request is suspicious
- Example: "User shows leaked credentials and request for data outside their normal scope"
- Security Admin adds comment: "Denied - Account shows confirmed compromise indicators, user password reset required"
- Request is denied immediately
- No further approval stages occur
- User receives denial notification with (optionally) explanation
- Security team initiates incident response for compromised account
Option 3: Timeout (No Response)
- Security Admin doesn't respond within configured timeframe (default 14 days)
- Request automatically denied
- User receives notification: "Request expired due to no response from required approvers"
- Audit logs capture the timeout
- This prevents requests from lingering indefinitely
Step 7: Conditional Continuation
If Security Admin Approved:
- Request continues to regular policy approvers
- Manager sees request with context: "Security review completed by Security Admin - Approved"
- Manager can still deny if business justification isn't appropriate
- If all approvers approve, access is granted
- Access includes configured expiration date
- User receives notification: "Your request has been approved"
If Security Admin Denied:
- Request ends immediately
- No further approval stages
- User receives notification: "Your request has been denied"
- Incident response may be triggered if compromise suspected
- User's account may be flagged for password reset, MFA re-enrollment, or device compliance check
Step 8: Audit and Reporting
All actions are fully logged:
- Initial request timestamp
- User's risk level at time of request
- Specific risk detections present
- Security Administrator who reviewed
- Security Administrator's decision (approve/deny)
- Security Administrator's comments
- Subsequent approver decisions
- Final outcome (access granted or denied)
- Timestamps for every action
This creates a complete audit trail showing that risky requests received appropriate security scrutiny before access was granted (or denied).
Approval Routing with Multiple Risk Types
Organizations can configure both ID Protection-based approvals AND Insider Risk Management approvals. When multiple risk types are configured, routing is sequential:
Request → ID Protection Review → [If approved] → Insider Risk Review → [If approved] → Policy Approvers → Access Assigned
Each review stage can independently approve or deny. All stages must approve for access to be granted. This creates defense in depth for highly sensitive access.
Configuring ID Protection-Based Approvals
Let's walk through the practical configuration steps.
Prerequisites
Before configuring ID Protection-based approvals, ensure these requirements are met:
Licensing:
- Microsoft Entra ID Governance license required for entitlement management
- Microsoft Entra ID Protection included in:
- Microsoft Entra ID P2
- Microsoft Entra Suite
- Microsoft 365 E5
- Per-user licensing model applies
ID Protection Deployment:
- Microsoft Entra ID Protection must be deployed and active
- ID Protection policies should be configured (sign-in risk policy, user risk policy)
- At least some users should be evaluated for risk (system needs data)
Role Requirements:
- Identity Governance Administrator role required to configure entitlement management
- Security Administrator role required to review risky requests
- At least one user must have Security Administrator role assigned
Security Administrator Assignment:
- Minimum one Security Administrator assigned (recommendation: 3-5 for coverage)
- Fallback approvers recommended for availability
- Consider follow-the-sun model for global organizations
Configuration Steps
Step 1: Access the Control Configuration
1. Navigate to Microsoft Entra admin center (https://entra.microsoft.com/)
2. Sign in with Identity Governance Administrator credentials
3. In left navigation, expand ID Governance
4. Select Entitlement management
5. Select Control configurations
6. Locate the Risk-based approval (Preview) card
7. Select View settings
Step 2: Enable Risk-Based Approval
1. On the Risk-based approval settings page, locate section: "Require approval for users with ID protection risk (Preview)"
2. Select Customize
3. A dialog appears showing ID protection risk configuration
Step 3: Set Risk Level Thresholds
The configuration dialog shows three risk level options. Select which risk levels should trigger security review:
Low Risk: (typically NOT selected)
- If enabled, all user access requests go through security review
- Creates significant approval bottleneck
- Not recommended unless handling extremely sensitive resources
- Recommendation: Leave unchecked
Medium Risk: (commonly selected)
- Access requests from users with medium risk route to security review
- Catches many potential compromises (credential reuse, unusual behaviors)
- Balances security and operational efficiency
- Recommendation: Enable for most organizations
High Risk: (typically selected)
- Access requests from users with high risk definitely need review
- Strong indicators of compromise present
- Always warrants security scrutiny
- Recommendation: Enable for all organizations
Recommended Configuration for Most Organizations:
- ✓ Medium Risk enabled
- ✓ High Risk enabled
- ☐ Low Risk disabled
This configuration catches genuinely risky requests while avoiding false positive overload.
Step 4: Review and Save
1. Review the selected risk thresholds
2. Understand the impact:
- "Requests from Medium and High risk users will require Security Administrator approval before proceeding to policy approvers"
3. Select Save to apply configuration
4. Configuration applies globally to all access packages in the tenant
Step 5: Assign Security Administrators
Now ensure you have Security Administrators assigned to handle reviews:
1. In Microsoft Entra admin center, go to Identity > Roles and administrators
2. Locate and select Security Administrator
3. Select Add assignments
4. Search for and select users who should be Security Administrators
5. Recommended team size: 3-5 Security Administrators for coverage
6. Consider:
- 24/7 coverage (distributed across time zones if global organization)
- Vacation/backup coverage
- Load distribution for high-volume environments
Step 6: (Optional) Configure Approval SLAs and Notifications
While Microsoft Entra doesn't have explicit SLA configuration for risk-based approvals, best practices include:
Establish Team SLAs:
- Document expected review timeframe (e.g., "Risky requests reviewed within 4 hours during business hours")
- Communicate SLAs to organization
- Monitor actual approval times and adjust staffing if needed
Set Up Alert Notifications:
- Configure email notifications for Security Administrators (enabled by default)
- Consider Microsoft Teams notifications for faster response
- Set up escalation procedures if requests not reviewed within SLA
Create Review Procedures:
- Document how Security Administrators should review risky requests
- Create decision framework (covered in next section)
- Train Security Administrators on review process
Post-Configuration Validation
After configuration, validate the system works correctly:
Test 1: Verify Low-Risk User Has Normal Flow
1. Identify a user with Low or No risk
2. Have them request an access package
3. Verify request goes directly to policy approvers (manager, etc.)
4. Verify NO Security Administrator review occurs
Test 2: Verify Medium-Risk User Triggers Security Review
1. Identify or create a Medium risk user (can use a test account)
- Simulate medium risk by signing in from unusual location via VPN
2. Have user request an access package
3. Verify request shows "Pending approval" status
4. Security Administrator should see request in their approval queue
5. Security Administrator should see risk level and details
6. Verify approval flow proceeds correctly after Security Admin approves
Test 3: Verify High-Risk User Triggers Security Review
1. Identify or create a High risk user
- Can manually set user risk to High in ID Protection for testing
2. Have user request access package
3. Verify Security Administrator sees request with High risk indicators
4. Test approval and denial flows
Test 4: Verify Audit Logs Capture Everything
1. Review audit logs after test approvals
2. Verify logs show:
- Initial risk level
- Risk detection details
- Security Administrator decision
- Comments added
3. Export audit log entry to verify format for compliance reporting
The Security Administrator's Review Process
Now that ID Protection-based approvals are configured, let's focus on the Security Administrator's role: reviewing risky requests and making informed decisions.
Accessing Pending Risky Requests
Security Administrators have two primary ways to access pending risky requests:
Option 1: Microsoft Entra Admin Center
1. Navigate to Microsoft Entra admin center (https://entra.microsoft.com/)
2. Go to ID Governance > Entitlement management
3. Select Requests tab
4. View shows all pending access requests across organization
5. Filter to show only requests pending your approval
6. Risky user requests are clearly marked with risk indicators (orange/red badges)
7. Select a request to review full details
Option 2: My Access Portal (Recommended for Daily Use)
1. Navigate to My Access Portal (https://myaccess.microsoft.com)
2. Sign in with Security Administrator credentials
3. Select Approvals tab
4. Section "Pending from others" shows requests requiring your action
5. Risk level is displayed prominently (Medium/High badge with color coding)
6. Click any request to review full details
7. Portal optimized for mobile use (approve from phone during off-hours)
Notification Methods:
- Email notifications when risky requests arrive
- Portal notifications (badge count shows pending approvals)
- Optional: Microsoft Teams integration for instant notifications
Information Available for Review
When reviewing a risky user's access request, Security Administrators see full context to make informed decisions:
User Identity Information:
- Username and display name: Who is requesting access?
- Email address: Contact information
- Department: What part of the organization?
- Manager: Who is their direct supervisor?
- Job title: What is their role?
- Recent activity summary: Overview of recent sign-ins and activities
Risk Information (Critical):
- Current risk level: Low/Medium/High with visual indicator
- Risk detection details: Specific indicators that triggered the risk flag
- Detection type (e.g., "Leaked credentials", "Atypical travel", "Unfamiliar sign-in properties")
- Detection timestamp (when was this risk detected?)
- Detection source (which system detected the risk?)
- Location information for sign-in risks (IP address, city, country)
- Device information (operating system, browser, device type)
- Historical risk patterns: Has this user been flagged as risky before? Is this an ongoing issue or first occurrence?
- Risk timeline: Chronological view of risk detections over past 30 days
Request Details:
- Access package name: What are they requesting?
- Resources included in package: Detailed list:
- Security groups
- Applications
- SharePoint sites
- Microsoft Entra roles
- API permissions
- Business justification: User's explanation for why they need access
- Requester's answers to policy questions: Any required question responses (e.g., "Which project requires this access?")
- Duration: How long will access last if approved?
- Expiration date: When will access automatically expire?
Approval Workflow Context:
- Normal policy approvers: Who would approve this after your security review?
- Manager's name and contact
- Department head or other approvers in chain
- Approval deadline: How long until request times out (default 14 days)?
- Previous approval history: Has this user requested similar access before? What was the outcome?
Decision Framework
Security Administrators need a structured approach to making consistent, informed decisions. Here's a decision framework:
Approve Despite Risk: When to Say Yes
1. Explained Risk - Legitimate Activity
- Scenario: User has legitimate explanation for risk detection
- Example: User flagged for "impossible travel" because they legitimately traveled internationally for business
- Risk: User authenticated from New York office at 2 PM, then from London office at 4 PM
- Explanation: User on transatlantic flight for international office visit
- Decision: Approve - Travel is pre-announced and verifiable
- Verification steps:
- Check corporate calendar for travel booking
- Contact user's manager to confirm travel
- Verify travel aligns with business needs
2. Expected Activity - Company Event
- Scenario: Risk detection matches known legitimate company activity
- Example: User flagged for "unfamiliar location" during company conference
- Risk: User signing in from Las Vegas hotel (unusual location)
- Context: Company is hosting annual sales conference in Las Vegas
- Decision: Approve - Known company event explains unusual location
- Verification steps:
- Check event calendar for company conference
- Verify user is expected attendee
- Confirm location matches event venue
3. Credential Reset Completed - Risk Remediated
- Scenario: User was risky, but has since remediated the risk
- Example: User flagged for "leaked credentials" but completed password reset
- Risk: User's password found in credential dump (High risk)
- Remediation: User completed guided password reset + MFA re-enrollment
- Current status: ID Protection shows risk remediated
- Decision: Approve - Compromise has been addressed
- Verification steps:
- Confirm password reset completion in audit logs
- Verify MFA re-enrollment
- Check that ID Protection risk status shows "Remediated" or "Dismissed"
4. Business Justification - Critical Business Need
- Scenario: Request is for critical business function that can't wait
- Important: This should NOT override clear compromise indicators, only minor risk flags
- Example: Medium risk user needs access to resolve P1 production incident
- Risk: User has "unfamiliar sign-in properties" (new laptop after hardware failure)
- Context: User is on-call engineer responding to production outage
- Business impact: Every minute of delay costs $10,000+ in lost revenue
- Decision: Approve with conditions
- Grant access for 12 hours only (not standard 90 days)
- Enable enhanced monitoring
- Require post-incident review
- Verification steps:
- Verify incident ticket exists and is critical
- Confirm user is assigned responder
- Document conditional approval in comments
Deny the Request: When to Say No
1. Multiple Risk Indicators - High Confidence of Compromise
- Scenario: Multiple independent detection methods flagging user
- Example: User shows three simultaneous risk detections
- Leaked credentials detected
- Sign-in from malware-linked IP address
- Failed access attempts to resources outside normal scope
- Decision: Deny - Very high confidence of actual compromise
- Actions to take:
- Deny request immediately
- Contact user's manager: "We're seeing indicators of account compromise"
- Initiate incident response
- Require password reset, MFA re-enrollment, device compliance check
- Monitor user's subsequent activity closely
2. Sensitive Resource + Any Risk - Extra Caution
- Scenario: User requesting access to highly sensitive data while showing risk
- Example: Medium risk user requesting "Customer Credit Card Data" access package
- Risk: Single detection - atypical travel
- Resource: Extremely sensitive PCI data
- Principle: Even low risk is too much for this resource
- Decision: Deny until risk completely remediated
- Actions to take:
- Deny request
- Contact user: "Your request requires additional security verification"
- Work with user to remediate risk (password reset, verify devices)
- Re-request after risk cleared
3. Behavioral Anomaly - Pattern Doesn't Match User
- Scenario: Risk detection represents behavior completely outside user's normal pattern
- Example: HR administrator requesting access to infrastructure automation
- Risk: User flagged for "unfamiliar resource access"
- Anomaly: HR user never requests developer/infrastructure access
- Red flag: Request scope doesn't match job function
- Decision: Deny - Suspicious request pattern
- Actions to take:
- Deny request
- Contact user directly: "We received an unusual access request from your account"
- Ask: "Did you submit this request?"
- If user didn't request: Initiate compromise response
- If user did request: Require detailed business justification and manager approval
4. Suspicious Justification - Explanation Doesn't Make Sense
- Scenario: Business justification doesn't align with request or user's role
- Example: Accounting department user requesting "DevOps Production Deployment" access
- Risk: Medium (unfamiliar sign-in)
- Justification: "Need this for my work"
- Red flag: Vague justification + scope doesn't match role
- Decision: Deny - Insufficient justification for risky request
- Actions to take:
- Deny request
- Require detailed justification
- Contact user's manager for validation
- Approve only after clear business need established
5. Recent Security Incident - Extra Scrutiny Period
- Scenario: User was recently subject to phishing or security incident
- Example: User clicked phishing link 48 hours ago, now requesting sensitive access
- Risk: Medium (from phishing incident response)
- Context: User reported clicking suspicious email link
- Incident response: In progress, not yet closed
- Decision: Deny until incident fully resolved
- Actions to take:
- Deny request
- Coordinate with incident response team
- Wait for "All Clear" from incident responders
- Require password reset + device reimaging
- Approve only after incident closure
Best Practices for Risk Review
1. Communicate with Users
Don't deny requests silently—communicate proactively:
When Denying:
- Add comments explaining security reasons: "Denied - Account shows indicators of compromise, password reset required"
- Follow up with direct communication:
- Email: "Hi Alice, we detected suspicious activity on your account..."
- Or call user directly for sensitive situations
- Provide clear next steps: "Please reset your password and re-submit your request"
- Prevents user frustration and enables quick remediation
When Approving Despite Risk:
- Document rationale in comments: "Approved - Confirmed legitimate business travel to London office per manager"
- This creates audit trail explaining why risky request was approved
- Enables consistency in future similar situations
2. Coordinate with Security Operations
Risk-based approvals should integrate with broader security operations:
If Risk Suggests Genuine Compromise:
- Don't just deny the request—escalate to Security Operations Center (SOC)
- Initiate formal incident response:
- User account may need immediate remediation (password reset, MFA reset, sign-out all sessions)
- Device may need compliance check or reimaging
- May need broader investigation (what else did compromised account access?)
- Follow your incident response playbook
Share Intelligence:
- If you see patterns (e.g., multiple users from same department showing risk), alert SOC
- May indicate targeted phishing campaign against that department
- Enables proactive defense
3. Document Decisions
Use approval comments to document decision rationale:
Good Comment Examples:
- "Approved - Confirmed with manager that user is traveling for London office project, risk is legitimate"
- "Denied - Multiple compromise indicators, initiated incident response ticket INC-12345"
- "Approved with conditions - Granted 4-hour access (not standard 90 days) for P1 incident response"
Why Documentation Matters:
- Audit logs capture comments for future reference
- Enables consistency (other Security Admins see your reasoning)
- Compliance evidence (auditors see security decisions were thoughtful)
- Learning opportunity (review decisions that led to incidents to improve)
4. Monitor Patterns
Review weekly reports to identify trends:
Metrics to Track:
- Total risky requests per week
- Approval rate vs. denial rate
- Most common risk detections triggering reviews
- Average review decision time
- Requests from same users repeatedly (potential chronic issue)
Pattern Examples:
Pattern: Finance department shows 10 risky requests in one week (usually 1-2)
Investigation: Possible targeted phishing campaign against finance
Action: Alert security awareness team, increase monitoring of finance department
Pattern: Same user flagged as risky 5 times in 30 days
Investigation: User has poor security hygiene (password reuse, clicking suspicious links)
Action: Required security training, manager notification, extra monitoring
Pattern: Medium risk threshold generating 100 reviews/week (team capacity is 50/week)
Investigation: Too many false positives overwhelming team
Action: Consider adjusting threshold to High risk only, or add more Security Administrators
5. Tune Risk Thresholds
Based on operational experience, adjust thresholds:
If Medium Risk Creates Bottleneck:
- Symptom: Security team overwhelmed with reviews, approval SLAs missed
- Analysis: 80% of medium risk reviews are false positives (legitimate activity)
- Action: Adjust threshold to High risk only
- Result: Review volume drops 60%, team can focus on truly risky requests
- Tradeoff: Some potential compromises might slip through
If Too Many Compromises Slipping Through:
- Symptom: Incidents involving users who recently got approved despite risk
- Analysis: High risk only isn't catching enough suspicious activity
- Action: Lower threshold to include Medium risk
- Result: More reviews required, but better security outcomes
- Tradeoff: Higher team workload
The Goal: Balance security protection with operational efficiency. Perfect security isn't achievable, but appropriate risk-based controls are.
Integrating ID Protection-Based Approvals with Azure Data Access
One of the most powerful applications of ID Protection-based approvals is protecting access to sensitive data in Azure. Let's walk through a detailed implementation.
Scenario: Protecting Customer Data in Azure Data Lake
Organization: E-commerce company stores customer data in Azure Data Lake Storage
Challenge: Need to ensure risky users cannot access sensitive customer data before security review
Solution: ID Protection-based approvals + Entitlement Management + Azure RBAC
Solution Architecture
┌─────────────────────────────────────────────────────────┐
│  User Requests "Customer Data Analyst" Access Package  │
│  (Contains: Azure RBAC group for Data Lake read access,│
│   SQL database access, Power BI workspace membership)  │
└────────────────────┬────────────────────────────────────┘
                     │
                     ▼
         ┌──────────────────────────┐
         │   ID Protection Check    │
         │   Is user risky?         │
         └────────────┬──────────────┘
                      │
              ┌───────┴──────┐
              │              │
         YES  │              │  NO
              │              │
              ▼              ▼
   ┌──────────────────┐   ┌──────────────────────┐
   │ Security Admin   │   │ Proceed directly to  │
   │ Review Required  │   │ Policy Approvers     │
   │ (High/Med risk)  │   │ (Manager, Data Gov)  │
   └────────┬─────────┘   └──────────┬───────────┘
            │                        │
            │ DENY                   │ APPROVE
            │          APPROVE       │
            │                        │
            ▼                        ▼
   ┌─────────────────┐      ┌─────────────────────┐
   │ Request Denied  │      │ Manager Reviews &   │
   │ User Notified   │      │ Approves            │
   │ Incident        │      │                     │
   │ Response        │      │ Data Governance     │
   │ Triggered       │      │ Lead Approves       │
   └─────────────────┘      └─────────┬───────────┘
                                      │
                                      ▼
                         ┌────────────────────────┐
                         │ Access Granted:        │
                         │ - Azure RBAC Group     │
                         │ - SQL DB Read Access   │
                         │ - Power BI Workspace   │
                         │ - 90 days duration     │
                         │ - Monitoring enabled   │
                         └────────────────────────┘
Implementation Steps
Step 1: Create Data Access Package
Create an access package specifically for data access with appropriate security:
Access Package Name: "Customer Data Analyst"
Description: "Access to customer data analytics resources"

Resources:
- Azure RBAC Security Group: "Data-Lake-Customer-Reader"
  (This group has "Storage Blob Data Reader" role on Customer Data Lake)
- Azure RBAC Security Group: "SQL-Analytics-Customer-Readers"
  (This group has "db_datareader" role on Customer Analytics Database)
- Microsoft 365 Group: "Data-Analytics-Team"
  (For collaboration and documentation)
- Application: Power BI Workspace "Customer Analytics"

Policies:
- Policy 1: Internal Data Analysts
  - Who can request: Data Analytics department members
  - Approvers:
    - Stage 1: Direct Manager (confirms business need)
    - Stage 2: Data Governance Lead (confirms data handling compliance)
  - Duration: 90 days
  - Renewal: Available (requires re-approval)
  - ID Protection: Enabled (Medium + High risk → Security review)

- Policy 2: External Contractors
  - Who can request: Connected organization "Analytics Partners Ltd"
  - Approvers:
    - Stage 1: Project Manager (confirms contract active)
    - Stage 2: Data Governance Lead (confirms data handling agreement signed)
    - Stage 3: Security Team (reviews contractor background)
  - Duration: 30 days
  - Renewal: Requires security re-approval
  - ID Protection: Enabled (Medium + High risk → Security review)
Step 2: Enable ID Protection-Based Approval
1. Configure ID Protection-based approvals with Medium+High risk thresholds (as covered earlier)
2. Ensure Security Administrators include:
- Data Security team members
- SOC team members
- IT Security team member
Step 3: Create Data Classification Metadata
Document sensitivity in access package description and metadata:
- Data Sensitivity Level: HIGH (contains PII, purchase history, payment methods)
- Compliance Frameworks: GDPR, PCI-DSS, CCPA
- Retention Requirements: 7 years (financial records)
- Audit Frequency: Monthly access reviews + quarterly attestation
- Incident Response: If risky user approved, enable enhanced monitoring (detailed logging)
Step 4: Configure Azure RBAC for Time-Limited Access
Ensure Azure RBAC groups support time-limited membership:
1. Create Azure RBAC Groups:
- Group Name: "Data-Lake-Customer-Reader"
- Type: Security (not Microsoft 365)
- Membership Type: Assigned (not dynamic, managed by entitlement management)
2. Assign Azure Role to Group:
- Navigate to Azure Data Lake Storage account
- Select Access Control (IAM)
- Add Role Assignment: "Storage Blob Data Reader"
- Assign to group: "Data-Lake-Customer-Reader"
- Scope: Entire storage account OR specific container (depending on requirements)
3. Verify Time-Limited Membership:
- When user is assigned to access package, they're added to group
- After 90 days (or configured duration), membership automatically expires
- User automatically loses Azure Data Lake access when removed from group
- No manual deprovisioning required
Step 5: Establish Security Review Procedures
Create specific procedures for Security Administrators reviewing data access requests:
Data Access Review Checklist:
When reviewing risky request for "Customer Data Analyst" package:
- ☐ Risk Level Appropriate? Is risk level consistent with requested data sensitivity?
- High risk requesting HIGH sensitivity data → Deny until risk remediated
- Medium risk requesting HIGH sensitivity data → Extra scrutiny required
- Low risk → Proceed with normal approvals
- ☐ Training Completed? Has user received required data governance training?
- Check training records
- Deny if required training not completed
- ☐ Access Necessary? Is access necessary for current role/project?
- Check user's job title and department
- Verify project assignment (if project-based access)
- Confirm with manager if unclear
- ☐ Legitimate Risk Explanation? Have legitimate reasons for risk flag been verified?
- Contact user or manager to confirm
- Document explanation in comments
- ☐ Manager Approved? Has user's manager confirmed and approved the need?
- In ID Protection flow, Security review happens FIRST
- Check if manager pre-approved (if direct assignment flow)
- Document manager confirmation
- ☐ Appropriate Duration? Should shorter duration be used due to risk?
- Standard: 90 days for internal users
- Consider: 30 days for risky users
- Consider: 7 days for high-risk users (if must approve)
- ☐ Enhanced Monitoring Needed? Should additional monitoring be enabled?
- For approved-but-risky users: Enable detailed audit logging
- Configure alerts for unusual data access patterns
- Monitor for mass data downloads
- ☐ Compliance Review? Does approval meet compliance requirements?
- GDPR: Is data processing agreement in place?
- PCI-DSS: Is user on approved personnel list?
- CCPA: Is access logged appropriately?
Step 6: Implement Detailed Audit Logging
For data access with ID Protection-based approvals:
Enable Azure Audit Logging:
1. Navigate to Azure Storage Account (Data Lake)
2. Select "Diagnostic settings"
3. Create diagnostic setting:
- Log Categories: StorageRead, StorageWrite, StorageDelete
- Destination: Log Analytics workspace
- Retention: 90 days minimum (compliance requirement)
Configure Alerts for Risky Users:
1. In Log Analytics, create query:
```kusto
StorageBlobLogs
| where AccountName == "customerdatalake"
| where Identity == "risky-approved-user@contoso.com"
| where OperationName in ("GetBlob", "ListBlobs")
| summarize AccessCount = count() by bin(TimeGenerated, 1h)
| where AccessCount > 100 // Alert if accessing >100 blobs/hour
```
2. Create alert rule:
- Alert name: "Risky User - Unusual Data Access Volume"
- Threshold: AccessCount > 100 in 1 hour
- Action Group: Notify Data Security team
- Result: Early detection of potential data exfiltration
Step 7: Continuous Monitoring and Review
Establish ongoing monitoring for data access governance:
Daily Tasks:
- Monitor access logs for suspicious data access patterns
- Alert if risky-approved users accessing data at unusual times (3 AM) or unusual volumes
- Review failed access attempts (user trying to access data they don't have permission for)
Weekly Tasks:
- Review new risky data access approvals granted in past week
- Check if any risky users had access automatically revoked due to risk escalation
- Analyze approval decision patterns (approved vs. denied ratios)
Monthly Tasks:
- Generate compliance report:
- Total data access requests
- Risky requests identified
- Security review outcomes
- Policy compliance rate
- Review and analyze risk patterns
- Tune risk thresholds if needed
Quarterly Tasks:
- Conduct formal access reviews (attestation)
- Review and update data classification
- Audit compliance with data access policies
- Train new Security Administrators on review procedures
Advanced: Conditional Access Integration
For maximum security, combine ID Protection-based approvals with Conditional Access policies:
Conditional Access Policy: Data Access Requires Secure Authentication
Policy Name: "Require MFA and Compliant Device for Data Access"

Conditions:
- Target Users: Members of "Data-Lake-Customer-Reader" group
- Target Apps: Azure Management, Azure Storage
- Locations: All locations

Grant Controls:
- Require multi-factor authentication: YES
- Require device to be marked as compliant: YES
- Require all selected controls (AND logic)

Result: Users with data access must use MFA + compliant device every time they access
Conditional Access Policy: Block Risky Users from Data Access
Policy Name: "Block High-Risk Users from Customer Data"

Conditions:
- Target Users: Members of "Data-Lake-Customer-Reader" group
- User Risk: High
- Sign-in Risk: High

Grant Controls:
- Block Access

Result: If user's risk escalates to High after access granted, they're blocked immediately
Combined Effect:
1. User requests data access while flagged as Medium risk
2. ID Protection-based approval requires Security Admin review ✓
3. Security Admin approves after investigation
4. Manager approves confirming business need
5. Access granted for 90 days
6. User attempts to access data, Conditional Access policy enforces:
- Require MFA ✓
- Require compliant device ✓
7. If user's risk escalates to High after access granted:
- Conditional Access policy blocks access immediately
- No further data access until risk remediated
This creates multiple layers of defense:
- Risk-based approval (preventive control)
- Time-limited access (detective control)
- MFA + compliant device (preventive control)
- Risk-based blocking (responsive control)
Real-World Example: Finance Team Data Access
Let's walk through a complete real-world scenario showing how all these pieces work together.
The Scenario
Organization: Global financial services company
User: Sarah Johnson, Financial Analyst in Accounting Department
Context: Sarah working on special project analyzing international expense patterns
Complication: Sarah just returned from international business travel
Timeline of Events
Day 1 - Monday, 9:00 AM (New York Time):
Sarah arrives at New York office after weekend trip to London for company project.
Day 1 - Monday, 9:15 AM:
Sarah signs into corporate network from her laptop at the office.
ID Protection Detection:
- Sign-in location: New York office
- Previous sign-in: London hotel (48 hours ago)
- Detection: Atypical travel pattern detected
- Risk Assessment: Medium risk assigned
- Reason: "Impossible travel - user location changed from London to New York in short timeframe"
Sarah is unaware her account is now flagged as Medium risk.
Day 1 - Monday, 10:00 AM:
Sarah realizes she needs access to "Finance Sensitive Data" access package for her international expense analysis project. She's never needed this level of access before.
Sarah navigates to My Access portal (https://myaccess.microsoft.com), discovers "Finance Sensitive Data" package:
- Resources: Azure Data Lake (international financial data), SQL database (expense reports), Power BI (financial analytics)
- Typical duration: 90 days
Sarah submits request:
- Business Justification: "Working on Q4 international expense analysis project for CFO"
- Expected completion: "30 days"
Day 1 - Monday, 10:01 AM:
Request submitted. System immediately performs risk assessment:
Risk Check:
- User: Sarah Johnson (sarah.johnson@contoso.com)
- Risk Level: MEDIUM
- Risk Detection: Atypical travel (London → New York, 48 hours)
- Configured Threshold: Medium + High risk → Security Review
- RESULT: Route to Security Administrator
Request does NOT proceed to Sarah's manager yet. Security review happens first.
Day 1 - Monday, 10:02 AM:
Michael Chen, Security Administrator, receives notification:
Email Subject: Access Request Requires Security Review - Medium Risk User

A user with elevated risk has requested access to sensitive resources:

User: Sarah Johnson (sarah.johnson@contoso.com)
Risk Level: MEDIUM
Risk Detection: Atypical travel detected 2 hours ago

Access Package: Finance Sensitive Data
Resources: Azure Data Lake (financial data), SQL database, Power BI workspace

Business Justification: "Working on Q4 international expense analysis project for CFO"

Action Required: Review and approve or deny this request
Review in portal: https://myaccess.microsoft.com/approvals
Day 1 - Monday, 11:00 AM:
Michael logs into My Access portal to review the request. He sees:
User Information:
- Name: Sarah Johnson
- Department: Accounting
- Title: Financial Analyst
- Manager: Jennifer Williams (Head of Accounting)
Risk Information:
- Risk Level: MEDIUM (orange badge)
- Risk Detection: Atypical travel
- Details: User authenticated from London (51.5074° N, 0.1278° W) at Sunday 2:00 PM UTC
- Then authenticated from New York (40.7128° N, 74.0060° W) at Monday 9:15 AM EDT
- Travel time: Approximately 45 hours (plausible for international flight + time zone change)
- Device: Same laptop in both locations (Sarah's corporate laptop)
- MFA: Successfully completed in both locations
Request Details:
- Access Package: Finance Sensitive Data (HIGH sensitivity)
- Resources: Customer financial data, expense reports, analytics tools
- Requested Duration: 90 days (standard policy)
- Business Justification: "Working on Q4 international expense analysis project for CFO"
Michael's Decision Process:
1. Assess Risk Legitimacy:
- Check: Is there a legitimate reason for international travel?
- Action: Check corporate calendar
- Finding: London office project meeting scheduled for last Friday
- Conclusion: Travel is legitimate company business
2. Verify Business Justification:
- Check: Is Sarah's role appropriate for this access?
- Sarah is Financial Analyst in Accounting = Appropriate
- Check: Does "Q4 expense analysis project" make sense?
- Action: Quick message to Jennifer Williams (Sarah's manager) via Teams
- Jennifer confirms: "Yes, Sarah is working on CFO-requested project analyzing our international expenses"
3. Assess Resource Sensitivity:
- Resources requested: HIGH sensitivity financial data
- User risk: Medium (but explained by legitimate travel)
- Typical practice: Would normally deny Medium risk for HIGH sensitivity
- However: Risk is explained + manager confirmed + business justification valid
4. Make Decision:
- Decision: APPROVE
- Rationale: Risk is false positive (legitimate business travel), manager confirmed project, role is appropriate
- Condition: Reduce duration from 90 days to 30 days (matches Sarah's stated project timeline)
- Add enhanced monitoring: Flag for data access volume alerts
Day 1 - Monday, 11:15 AM:
Michael approves the request with detailed comment:
Security Review Decision: APPROVED

Rationale:
- Risk detection (atypical travel) verified as legitimate business travel to London office
- Manager (Jennifer Williams) confirmed user is assigned to Q4 international expense analysis project
- Role (Financial Analyst) appropriate for requested resources
- Business justification clear and verifiable

Conditions:
- REDUCED DURATION: 30 days (not standard 90 days) to match stated project timeline
- Enhanced monitoring enabled: Alert if data access volume exceeds normal analyst baseline

Approver: Michael Chen, Security Administrator
Timestamp: 2025-11-26 11:15:00 EDT
Day 1 - Monday, 11:16 AM:
Request now proceeds to normal policy approvers:
Stage 1: Manager Approval
Jennifer Williams (Sarah's manager) receives request:
Access Request Pending Your Approval

User: Sarah Johnson
Access Package: Finance Sensitive Data
Duration: 30 days (modified by Security review)
Business Justification: "Working on Q4 international expense analysis project for CFO"

Security Review: Completed by Michael Chen (approved)
Comments: "Risk detection verified as legitimate business travel, manager confirmed project..."
Jennifer sees that Security has already reviewed and approved. She reviews business justification and confirms Sarah needs this for the CFO project.
11:30 AM: Jennifer approves.
Stage 2: Data Governance Lead Approval
Robert Martinez (Data Governance Lead) receives request:
Access Request Pending Your Approval

User: Sarah Johnson
Access Package: Finance Sensitive Data
Duration: 30 days
Previous Approvals:
- Security Review: Michael Chen (approved)
- Manager: Jennifer Williams (approved)
Robert verifies Sarah has completed required data governance training (completed 6 months ago, still valid). He confirms financial analysts regularly need this type of access for analysis projects.
12:00 PM: Robert approves.
Day 1 - Monday, 12:01 PM:
All approvals complete. Access assignment created:
- Sarah added to "Data-Lake-Finance-Reader" security group
- Sarah added to "SQL-Analytics-Readers" security group
- Sarah granted Power BI workspace access
- Duration: 30 days (expires December 26)
- Enhanced monitoring: ENABLED
Sarah receives notification:
Your access request has been approved!

Access Package: Finance Sensitive Data
Expiration Date: December 26, 2025
Resources: Azure Data Lake, SQL Analytics Database, Power BI Workspace

Your access will automatically expire on December 26. You can request renewal if needed.

All data access is monitored and logged for compliance.
Day 1 - Monday, 2:00 PM:
Sarah begins work on international expense analysis project. She accesses Azure Data Lake to retrieve Q4 expense data from international offices.
Behind the scenes:
- Every data access is logged in Azure audit logs
- Enhanced monitoring tracks Sarah's access patterns
- Baseline established: "Sarah typically accesses 50-100 expense records per day for analysis"
Day 5 - Friday, 9:00 AM:
Sarah continues working on project. Access pattern remains normal (60 records accessed per day this week).
Day 10 - Next Wednesday:
Sarah's account risk is re-evaluated by ID Protection:
- No further suspicious sign-ins detected
- Travel pattern now normal (office location consistent)
- Risk Level: Automatically downgraded to LOW
Sarah is unaware, but if she requested additional access now, no Security review would be required.
Day 26 - December 26:
Sarah has completed the expense analysis project. Access automatically expires:
- Sarah removed from "Data-Lake-Finance-Reader" group
- Sarah removed from "SQL-Analytics-Readers" group
- Power BI workspace access revoked
- Automatic expiration, no manual cleanup required
Post-Project:
Audit trail captured:
- Initial request with Medium risk flag
- Security Administrator review and approval with rationale
- Manager and Data Governance approvals
- 30 days of data access (logged)
- Enhanced monitoring results (no anomalies detected)
- Automatic expiration
Compliance team has complete documentation:
- Why access was granted despite risk (legitimate travel, verified)
- Who approved at each stage
- What data Sarah accessed
- When access was revoked
What Made This Work
1. Risk Detection Worked:
- ID Protection correctly flagged atypical travel (even though false positive, system worked as designed)
2. Security Review Added Value:
- Security Administrator investigated and determined risk was false positive
- Prevented unnecessary denial while maintaining security scrutiny
- Reduced duration to match actual need (30 vs. 90 days)
3. Multi-Stage Approval Provided Defense in Depth:
- Security review (risk assessment)
- Manager approval (business need confirmation)
- Data Governance approval (compliance verification)
4. Automation Prevented Issues:
- Automatic expiration after 30 days (no orphaned access)
- Enhanced monitoring detected no anomalies
- Compliance audit trail automatically created
5. Communication Was Smooth:
- Security Administrator contacted manager to verify
- Comments documented rationale for future reference
- User received clear notifications at each stage
This is ID Protection-based approvals working exactly as designed: catching potentially risky requests, enabling informed human decisions, and protecting sensitive data while still enabling legitimate work.
What's Next in This Series
In this post, we've covered the fundamentals of ID Protection-based approvals for human users. You learned:
- How compromised accounts can exploit normal approval workflows
- What Microsoft Entra ID Protection is and how it detects risk
- How to configure risk-based approval workflows
- The Security Administrator's review process and decision framework
- How to protect Azure data access with risk-based controls
- Real-world scenarios showing the system in action
But we're not done yet. In Part 4: Protecting AI Agents with ID Protection, we'll dive deep into the unique challenges of protecting autonomous agents:
- Why AI agents are fundamentally different (and more dangerous) when compromised
- The 6 risk detection types specifically designed for agents
- How to apply ID Protection-based approvals to agent access requests
- Viewing and managing risky agents in the dashboard
- Conditional Access policies for blocking high-risk agents
- Real-world scenarios of detecting and stopping compromised agents
- Best practices for agent security at scale
AI agents present unique challenges that deserve focused, deep coverage. Let's tackle that next.

References
- Microsoft Entra ID Protection Overview
- Risk-Based Approvals in Entitlement Management
- What are Risk Detections?
- Configure and Enable Risk Policies
- Investigate Risk in ID Protection
- Remediate Risks and Unblock Users
Continue to: Part 4 - Protecting AI Agents with ID Protection →