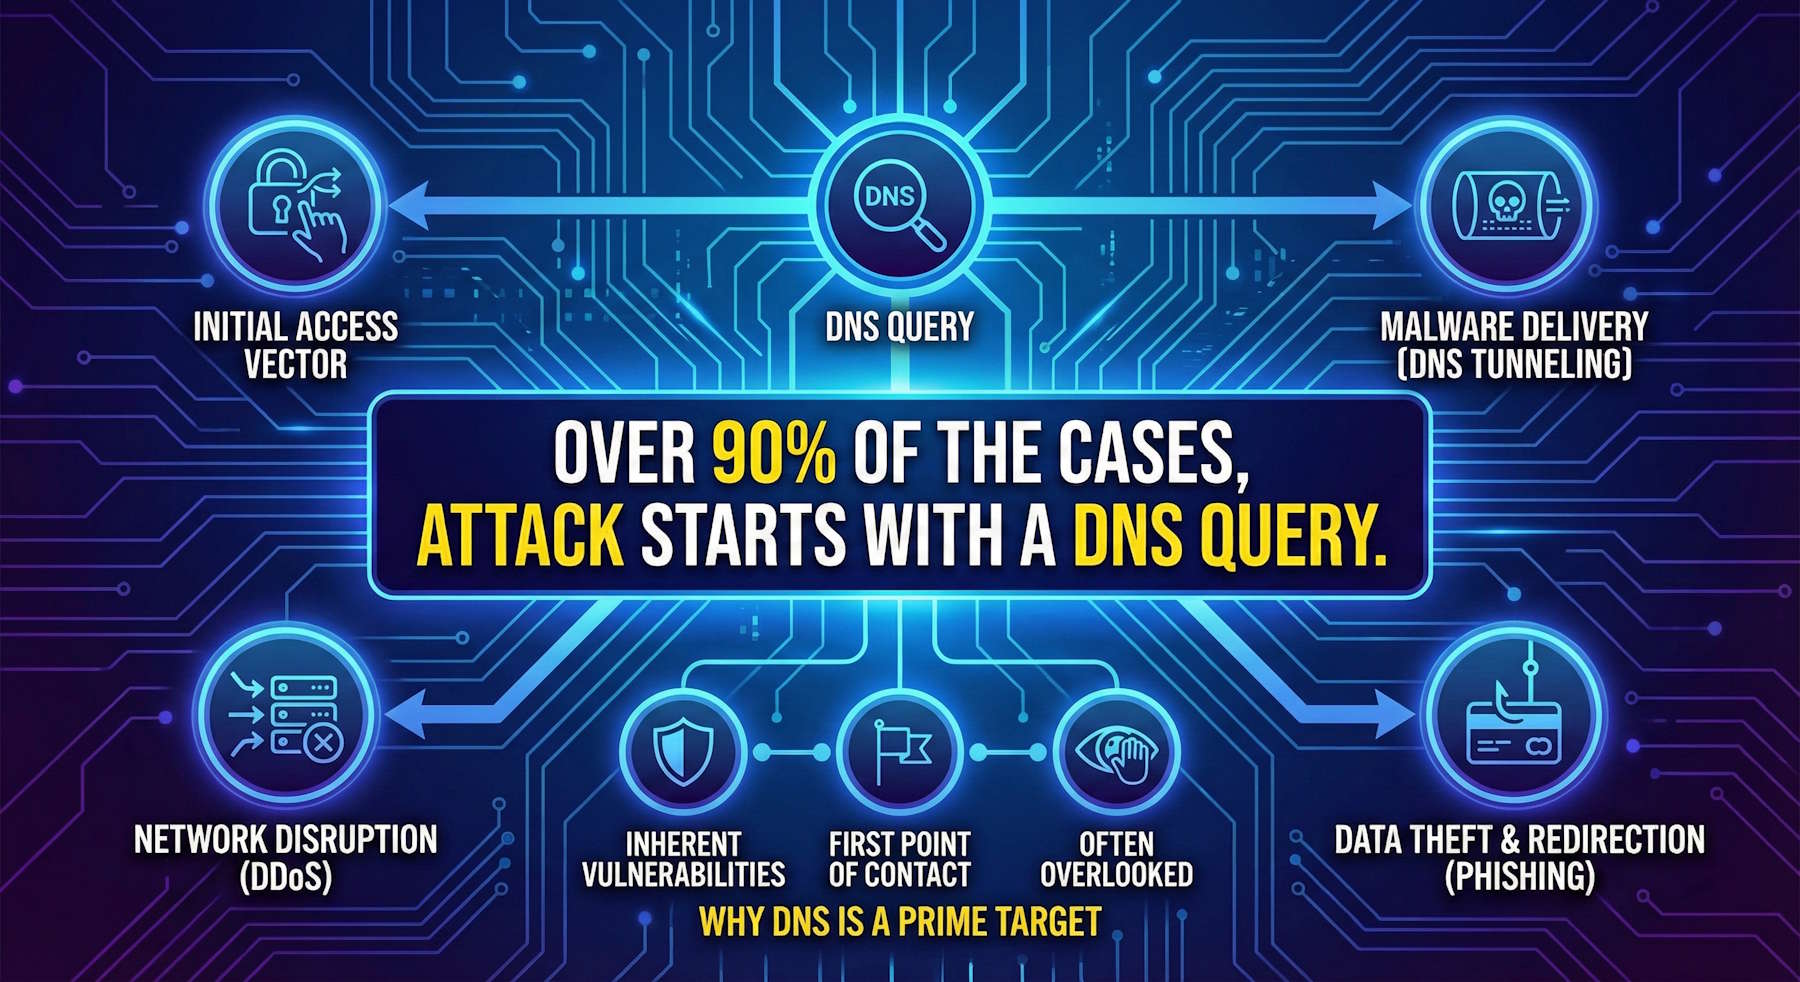
The Reality: Over 90% of Attacks Begin with DNS
> Critical Security Truism: "Over 90% of the cases, attack starts with a DNS query."
This statement represents a significant cybersecurity reality because nearly every internet transaction starts with a DNS query, making the Domain Name System a critical first step in many attacks. Because DNS was not originally built with security in mind, attackers exploit its vulnerabilities to steal data, deliver malware, or launch large-scale disruptions like DDoS attacks.
When your virtual machines, containers, or applications in Azure need to connect to external services, the first action they take is a DNS lookup. That single, seemingly innocent query can be the entry point for compromise—and most organizations have limited visibility into this critical attack surface.
Azure DNS Security Policy with Threat Intelligence (now in General Availability) addresses this blind spot by providing enterprise-grade filtering, logging, and real-time protection at the DNS layer across all your Azure virtual networks.
How DNS is Used in Attacks
1. Initial Access Vector
When a device connects to the internet, the first action is a DNS lookup to find the IP address for a domain. Attackers can intercept this initial query to redirect the user or gain a foothold in the network.
Attack Example:
graph LR
    A[Compromised VM] --> B[DNS Query:
pennywise.it]
    B --> C[Public DNS Resolver]
    C --> D[Returns Attacker IP]
    D --> E[VM Connects to C2 Server]
    E --> F[Data Exfiltration Begins]

    style A fill:#ffcccc,stroke:#d32f2f,stroke-width:2px
    style E fill:#ffcccc,stroke:#d32f2f,stroke-width:2px
    style F fill:#ff0000,stroke:#d32f2f,stroke-width:3px
Without DNS security controls, this happens silently—no firewall alerts, no network monitoring flags, just a normal DNS query that establishes a command-and-control (C2) channel.
2. Malware Delivery via DNS Tunneling
DNS can be used to hide command and control (C2) traffic from malware. Attackers use techniques like DNS tunneling to conceal data within normal-looking DNS queries to an attacker-controlled server.
How DNS Tunneling Works:
Normal DNS Query:
www.cloudnoso.com → Returns IP

Tunneled Data in DNS Query:
aGVsbG8gd29ybGQ.pennywise.it
     ↑
  Base64-encoded data hidden in subdomain
The attacker's DNS server decodes the subdomain as data, effectively bypassing network security controls that don't inspect DNS traffic.
Example Attack Flow:
graph TD
    A[Infected Workload] --> B[Encodes Stolen Data
in DNS Queries]
    B --> C[DNS Query to
attacker-controlled domain]
    C --> D[Attacker's DNS Server
Decodes Data]
    D --> E[Data Successfully Exfiltrated]

    style A fill:#ffcccc,stroke:#d32f2f,stroke-width:2px
    style C fill:#fff4ce,stroke:#f9a825,stroke-width:2px
    style E fill:#ff0000,stroke:#d32f2f,stroke-width:3px
3. Network Disruption: Large-Scale DDoS
A well-known example is the 2016 DDoS attack on DNS provider Dyn, which used DNS itself to launch a massive distributed denial-of-service attack that paralyzed access to many major websites including Twitter, Netflix, Reddit, and GitHub.
The attack exploited millions of IoT devices (the Mirai botnet) to flood Dyn's DNS servers with traffic, making it impossible for legitimate DNS queries to be processed. The result: websites were unreachable not because they were down, but because no one could resolve their domain names to IP addresses.
4. Data Theft and Redirection via DNS Poisoning
A DNS attack can trick users into visiting a malicious site by poisoning the DNS cache with a fake IP address for a legitimate domain. This technique is used for:
- Phishing: Redirect users to fake login pages that steal credentials
- Credential harvesting: Capture usernames and passwords for legitimate services
- Malware distribution: Serve malicious downloads from domains users trust
Attack Example:
graph LR
    A[User Requests
bank.com] --> B{Poisoned DNS Cache}
    B -->|Returns Fake IP| C[Attacker's Server]
    C --> D[Fake Banking Site]
    D --> E[User Enters Credentials]
    E --> F[Credentials Stolen]

    style B fill:#fff4ce,stroke:#f9a825,stroke-width:2px
    style C fill:#ffcccc,stroke:#d32f2f,stroke-width:2px
    style F fill:#ff0000,stroke:#d32f2f,stroke-width:3px
The user sees what appears to be their bank's website (correct domain name in the browser), but they're actually connecting to an attacker-controlled server.
The Solution: Azure DNS Security Policy
Azure DNS Security Policy offers the ability to filter and log DNS queries at the virtual network (VNet) level. Policy applies to both public and private DNS traffic within a VNet, giving you comprehensive visibility and control over all DNS activity in your Azure environment.
Architecture Overview
graph TD
    A[Azure VNet Resources] --> B{Azure DNS Security Policy}
    B --> C{Traffic Rules
Priority-Based}
    C -->|Rule Match| D{Action Type}
    D -->|Allow| E[Permitted & Logged]
    D -->|Block| F[Blocked & Logged]
    D -->|Alert| G[Permitted & Alerted]

    E --> H[External DNS Resolution]

    B --> I[DNS Domain Lists]
    I --> J[Custom Lists]
    I --> K[Threat Intelligence Feed
MSRC-Managed]

    B --> L[Logging Output]
    L --> M[Log Analytics]
    L --> N[Storage Account]
    L --> O[Event Hubs]

    style B fill:#e1f5ff,stroke:#0078d4,stroke-width:3px
    style C fill:#fff4ce,stroke:#f9a825,stroke-width:2px
    style F fill:#ffcccc,stroke:#d32f2f,stroke-width:2px
    style K fill:#c8e6c9,stroke:#388e3c,stroke-width:2px
Key Capabilities
1. DNS Traffic Filtering
Control what domains your Azure resources can resolve using priority-based rules:
- Allow: Permit DNS queries and log them
- Block: Prevent DNS resolution and log the block action
- Alert: Allow queries but generate alerts for monitoring
Example Scenario:
graph LR
    A[VM Queries
known-malware-site.com] --> B{DNS Traffic Rule
Priority 100}
    B -->|Domain in Blocklist| C[Block Action]
    C --> D[DNS Query Fails]
    D --> E[Connection Prevented]
    E --> F[Security Team Alerted]

    style B fill:#fff4ce,stroke:#f9a825,stroke-width:2px
    style C fill:#ffcccc,stroke:#d32f2f,stroke-width:2px
    style E fill:#c8e6c9,stroke:#388e3c,stroke-width:2px
2. Threat Intelligence Feed (Microsoft MSRC)
The most powerful feature: Azure DNS Security Policy now integrates with Microsoft's Security Response Center (MSRC) Threat Intelligence feed—a continuously updated, managed domain list of known malicious domains.
Benefits:
✅ Smart Protection: Almost all attacks begin with a DNS query. Threat Intelligence managed domain list enables you to detect and prevent security incidents early in the attack chain.
✅ Continuous Updates: Microsoft automatically updates the feed, protecting against newly detected malicious domains without manual intervention.
✅ Malicious Domain Monitoring: Choose alert-only mode to observe activity, or blocking mode to prevent connections to known malicious domains.
✅ Zero Maintenance: Unlike custom blocklists that require manual updates, MSRC's Threat Intelligence feed is fully managed by Microsoft's security team.
How the Threat Intelligence Feed Works:
graph TD
    A[Microsoft Security
Response Center] --> B[Threat Intelligence Feed]
    B --> C[Known Malicious Domains
Continuously Updated]
    C --> D[Azure DNS Security Policy
Managed Domain List]

    E[VM Makes DNS Query] --> F{DNS Security Policy Check}
    F -->|Query Matches
Threat Intelligence Feed| G[Block/Alert Action]
    F -->|No Match| H[Allow Resolution]

    G --> I[Security Incident Prevented]
    H --> J[Normal Traffic Flows]

    style A fill:#e1bee7,stroke:#8e24aa,stroke-width:2px
    style D fill:#c8e6c9,stroke:#388e3c,stroke-width:2px
    style G fill:#ffcccc,stroke:#d32f2f,stroke-width:2px
    style I fill:#c8e6c9,stroke:#388e3c,stroke-width:2px
3. Comprehensive DNS Logging
Every DNS query from resources in protected VNets is logged with:
- Source: Which Azure resource made the query
- Destination: Which domain was queried
- Action: Allow, Block, or Alert
- Timestamp: When the query occurred
- Policy Rule: Which rule was triggered
Logging Destinations:
- Log Analytics Workspace: Query logs with KQL for advanced analysis
- Storage Account: Long-term archival for compliance
- Event Hubs: Real-time streaming to SIEM systems
Example Log Query (KQL):
AzureDiagnostics
| where Category == "DnsSecurityPolicy"
| where Action == "Block"
| summarize BlockedCount = count() by DestinationDomain, SourceIP
| order by BlockedCount desc
| take 10
This query identifies the top 10 blocked domains and which source IPs are attempting to reach them—critical for incident response.
4. Regional Deployment & VNet Linking
DNS security policies are region-specific but can be linked to multiple VNets in the same region:
Architecture:
Region: East US
├── DNS Security Policy: eastus-policy
│   ├── Linked to VNet: prod-vnet-1
│   ├── Linked to VNet: prod-vnet-2
│   └── Linked to VNet: dev-vnet-1
│
Region: West Europe
├── DNS Security Policy: westeu-policy
│   ├── Linked to VNet: prod-vnet-3
│   └── Linked to VNet: staging-vnet-1
Important Constraint: A VNet can only be linked to one DNS security policy at a time, but a single policy can protect multiple VNets.
5. DNS Domain Lists
Create custom domain lists for granular control:
Example Domain Lists:
List: approved-external-services
├── api.openai.com
├── azure.microsoft.com
└── github.com

List: high-risk-categories
├── *.torrent
├── *.gambling
└── *.adult-content

List: internal-blocklist
├── competitor-intel.com
├── unauthorized-cloud-storage.com
└── suspicious-api-endpoint.com
CNAME Chain Inspection:
DNS Security Policy inspects CNAME chains to prevent evasion. If you block `pennywise.it`, and `cloudnoso.com` resolves via CNAME to `pennywise.it`, the policy blocks both.
Query: cloudnoso.com
CNAME Chain:
  cloudnoso.com → cdn.cloudnoso.com → pennywise.it
               ↑
     Rule blocks entire chain
Configuration: Step-by-Step Setup
Prerequisites
✅ Azure Subscription with appropriate permissions
✅ Virtual Network(s) in Azure with resources you want to protect
✅ Log Analytics Workspace (optional, but recommended for logging)
✅ DNS Security Policy Management role or higher
Step 1: Create DNS Security Policy
Using Azure Portal:
1. Navigate to Azure Portal
2. Search for DNS Security Policies
3. Click + Create
4. Configure:
- Name: `prod-dns-security-policy`
- Region: Same region as your VNets (e.g., East US)
- Resource Group: Your target resource group
5. Click Review + Create
Using Azure CLI:
az network dns security-policy create \
  --name prod-dns-security-policy \
  --resource-group myResourceGroup \
  --location eastus
Step 2: Create DNS Domain Lists
Option A: Custom Domain List
1. In your DNS Security Policy, go to Settings > DNS Domain Lists
2. Click + Add
3. Configure:
- Name: `custom-blocklist`
- Domains:
```
malicious-site1.com
phishing-site2.com
*.suspicious-tld
```
4. Click Save
Option B: Enable Threat Intelligence Feed
1. In your DNS Security Policy, go to Settings > DNS Domain Lists
2. Select Threat Intelligence Feed (managed by Microsoft)
3. Click Enable
Using Azure PowerShell:
# Create custom domain list
$domains = @("malicious-site1.com", "phishing-site2.com", "*.suspicious-tld")
New-AzDnsSecurityPolicyDomainList `
  -ResourceGroupName "myResourceGroup" `
  -PolicyName "prod-dns-security-policy" `
  -Name "custom-blocklist" `
  -Domain $domains

# Enable Threat Intelligence Feed
Enable-AzDnsSecurityPolicyThreatIntelligence `
  -ResourceGroupName "myResourceGroup" `
  -PolicyName "prod-dns-security-policy"
Step 3: Configure DNS Traffic Rules
Create rules that define actions for DNS queries:
Example Rules:
| Priority | Name | Domain List | Action | Enabled |
|---|---|---|---|---|
| 100 | Block Threat Intelligence | Threat Intelligence Feed | Block | Yes |
| 200 | Alert on High-Risk Domains | high-risk-categories | Alert | Yes |
| 300 | Allow Approved Services | approved-external-services | Allow | Yes |
| 65000 | Log All Other Traffic | . (all domains) | Alert | Yes |
Using Azure Portal:
1. Go to Settings > DNS Traffic Rules
2. Click + Add Rule
3. Configure first rule:
- Priority: 100
- Name: Block Threat Intelligence
- Domain List: Threat Intelligence Feed
- Action: Block
- Enabled: Yes
4. Repeat for remaining rules
Using Azure CLI:
# Rule 1: Block Threat Intelligence
az network dns security-policy rule create \
  --resource-group myResourceGroup \
  --policy-name prod-dns-security-policy \
  --name BlockThreatIntelligence \
  --priority 100 \
  --domain-lists ThreatIntelligenceFeed \
  --action Block \
  --enabled true

# Rule 2: Alert on High-Risk Domains
az network dns security-policy rule create \
  --resource-group myResourceGroup \
  --policy-name prod-dns-security-policy \
  --name AlertHighRiskDomains \
  --priority 200 \
  --domain-lists high-risk-categories \
  --action Alert \
  --enabled true
Step 4: Link VNets to Policy
1. Go to Settings > Virtual Network Links
2. Click + Add
3. Select the VNets you want to protect (must be in same region)
4. Click Add
Using Azure PowerShell:
New-AzDnsSecurityPolicyVnetLink `
  -ResourceGroupName "myResourceGroup" `
  -PolicyName "prod-dns-security-policy" `
  -Name "prod-vnet-1-link" `
  -VirtualNetworkId "/subscriptions/{sub-id}/resourceGroups/myResourceGroup/providers/Microsoft.Network/virtualNetworks/prod-vnet-1"
Step 5: Configure Diagnostic Logging
Enable logging to capture all DNS activity:
1. Go to Monitoring > Diagnostic Settings
2. Click + Add diagnostic setting
3. Configure:
- Name: `dns-security-logs`
- Categories: Select DnsSecurityPolicy
- Destination:
- ✅ Send to Log Analytics Workspace
- ✅ Archive to Storage Account (optional)
- ✅ Stream to Event Hub (optional)
4. Click Save
Using Azure CLI:
az monitor diagnostic-settings create \
  --name dns-security-logs \
  --resource /subscriptions/{sub-id}/resourceGroups/myResourceGroup/providers/Microsoft.Network/dnsSecurityPolicies/prod-dns-security-policy \
  --workspace /subscriptions/{sub-id}/resourceGroups/myResourceGroup/providers/Microsoft.OperationalInsights/workspaces/myLogAnalytics \
  --logs '[{"category": "DnsSecurityPolicy", "enabled": true}]'
Real-World Protection Scenarios
Scenario 1: Blocking Command & Control Traffic
Without DNS Security Policy:
graph LR
    A[Compromised VM] --> B[DNS Query:
pennywise.it]
    B --> C[Public DNS
Resolves to Attacker IP]
    C --> D[VM Connects to C2]
    D --> E[Data Exfiltration]
    E --> F[Ransomware Deployment]

    style A fill:#ffcccc,stroke:#d32f2f,stroke-width:2px
    style D fill:#ff0000,stroke:#d32f2f,stroke-width:3px
    style F fill:#ff0000,stroke:#d32f2f,stroke-width:3px
With DNS Security Policy + Threat Intelligence:
graph LR
    A[Compromised VM] --> B[DNS Query:
pennywise.it]
    B --> C{DNS Security Policy}
    C -->|Domain in Threat
Intelligence Feed| D[Query Blocked]
    D --> E[Security Alert Generated]
    E --> F[Incident Response Triggered]
    F --> G[VM Isolated & Remediated]

    style C fill:#fff4ce,stroke:#f9a825,stroke-width:2px
    style D fill:#ffcccc,stroke:#d32f2f,stroke-width:2px
    style G fill:#c8e6c9,stroke:#388e3c,stroke-width:2px
Result: The attack is stopped at the DNS layer—the compromised VM cannot establish C2 communication, preventing data exfiltration and further malicious activity.
Scenario 2: Detecting Insider Threat
Scenario: A malicious insider attempts to exfiltrate sensitive data by uploading to an unauthorized cloud storage service.
Without DNS Security Policy:
graph LR
    A[Insider's VM] --> B[DNS Query:
unauthorized-storage.com]
    B --> C[Resolves Successfully]
    C --> D[File Upload Begins]
    D --> E[Data Loss]
    E --> F[Compliance Violation]

    style D fill:#ffcccc,stroke:#d32f2f,stroke-width:2px
    style E fill:#ff0000,stroke:#d32f2f,stroke-width:3px
    style F fill:#ff0000,stroke:#d32f2f,stroke-width:3px
With DNS Security Policy:
graph LR
    A[Insider's VM] --> B[DNS Query:
unauthorized-storage.com]
    B --> C{DNS Traffic Rule
Priority 200}
    C -->|Domain in
Unapproved Services| D[Alert Generated]
    D --> E[Query Allowed
But Monitored]
    E --> F[Security Team Notified]
    F --> G[Investigation Initiated]
    G --> H[Access Revoked]

    style C fill:#fff4ce,stroke:#f9a825,stroke-width:2px
    style D fill:#ffe082,stroke:#f9a825,stroke-width:2px
    style H fill:#c8e6c9,stroke:#388e3c,stroke-width:2px
Result: The DNS query triggers an alert (but is not blocked), allowing security teams to investigate and respond before significant data loss occurs.
Scenario 3: Preventing DNS Tunneling
Scenario: Malware attempts to exfiltrate data using DNS tunneling to an attacker-controlled domain.
Without DNS Security Policy:
graph LR
    A[Infected Container] --> B["DNS Queries:
base64data.pennywise.it"]
    B --> C[Public DNS Resolver]
    C --> D[Attacker's DNS Server]
    D --> E[Data Decoded & Stolen]

    style A fill:#ffcccc,stroke:#d32f2f,stroke-width:2px
    style E fill:#ff0000,stroke:#d32f2f,stroke-width:3px
With DNS Security Policy + Threat Intelligence:
graph LR
    A[Infected Container] --> B["DNS Queries:
base64data.pennywise.it"]
    B --> C{DNS Security Policy}
    C -->|Attacker Domain in
Threat Intelligence Feed| D[All Queries Blocked]
    D --> E[Tunneling Prevented]
    E --> F[Alert Generated]
    F --> G[Container Isolated]

    style C fill:#fff4ce,stroke:#f9a825,stroke-width:2px
    style D fill:#ffcccc,stroke:#d32f2f,stroke-width:2px
    style E fill:#c8e6c9,stroke:#388e3c,stroke-width:2px
Result: The DNS tunneling attempt fails because the attacker's domain is in Microsoft's Threat Intelligence feed, and all queries are blocked.
Scenario 4: Compliance & Audit Requirements
Scenario: Your organization needs to demonstrate DNS traffic visibility for SOC 2 / ISO 27001 compliance.
Solution:
graph TD
    A[Azure VNet Resources] --> B[DNS Security Policy]
    B --> C[All DNS Queries Logged]
    C --> D[Log Analytics Workspace]
    D --> E[KQL Queries for Analysis]
    E --> F[Compliance Reports]

    D --> G[Azure Sentinel Integration]
    G --> H[Security Alerts]

    D --> I[Power BI Dashboards]
    I --> J[Executive Reporting]

    style B fill:#e1f5ff,stroke:#0078d4,stroke-width:2px
    style F fill:#c8e6c9,stroke:#388e3c,stroke-width:2px
    style H fill:#fff4ce,stroke:#f9a825,stroke-width:2px
Audit Query Examples:
// Query 1: Show all blocked DNS queries in the last 7 days
AzureDiagnostics
| where Category == "DnsSecurityPolicy"
| where Action == "Block"
| where TimeGenerated > ago(7d)
| project TimeGenerated, SourceIP, DestinationDomain, RuleName
| order by TimeGenerated desc

// Query 2: Identify top sources of blocked queries
AzureDiagnostics
| where Category == "DnsSecurityPolicy"
| where Action == "Block"
| summarize BlockedCount = count() by SourceIP
| order by BlockedCount desc
| take 20

// Query 3: Detect potential DNS tunneling attempts (high query volume)
AzureDiagnostics
| where Category == "DnsSecurityPolicy"
| summarize QueryCount = count() by SourceIP, DestinationDomain, bin(TimeGenerated, 1m)
| where QueryCount > 50  // More than 50 queries per minute to same domain
| order by QueryCount desc
Why This Matters for Your Security
Think about it: you're stopping attacks at the DNS layer, before they can even establish connections to malicious infrastructure. That's huge. You get complete visibility into every DNS query from your Azure VNets—critical for both compliance requirements and understanding what's actually happening in your environment.
Microsoft's MSRC team continuously updates the threat feed, so you're not stuck maintaining blocklists manually. You can choose how strict you want to be—Allow, Block, or Alert—based on your organization's security posture and risk tolerance. Since it's a native Azure service, you're not paying for third-party DNS filtering solutions or managing additional VM-based appliances.
It integrates natively with the tools you're already using:
- Azure Private DNS Zones
- Azure Private Resolver
- Log Analytics & Azure Sentinel
- Event Hubs for SIEM integration
- Storage Accounts for long-term archival
You can deploy policies across all Azure public regions with consistent configuration, and the performance impact is near-zero—DNS resolution happens at Azure's edge, so your applications won't notice the difference.
Requirements and Limitations
Current Limitations
| Category | Limit |
|---|---|
| VNet Restrictions | DNS security policies can only be applied to VNets in the same region as the policy |
| Policy per VNet | A VNet can only be linked to one DNS security policy |
| Security Policies per Subscription | 1,000 |
| DNS Traffic Rules per Policy | 100 |
| Domain Lists per Policy | 2,000 |
| Large Domain Lists | 100,000 domains per large domain list |
| Total Domains Across All Lists | 100,000 |
Important Considerations
⚠️ Rule Priority Matters: Lower numbers = higher priority. If `cloudnoso.com` is blocked in priority 100 but allowed in priority 200, it will be blocked.
⚠️ DNS Hierarchy: Rules follow DNS hierarchy. If you allow `cloudnoso.com`, then `sub.cloudnoso.com` is also allowed even if explicitly blocked in a lower-priority rule.
⚠️ Wildcard Domain Caution: Be careful with wildcard domains (e.g., `.` for all domains). Blocking all domains can prevent required Azure services from working.
⚠️ CNAME Chain Inspection: DNS Security Policy inspects CNAME chains, so blocking a domain also blocks any domain that resolves to it via CNAME.
Best Practices
1. Start with Alert-Only Mode
Before enabling blocking, deploy DNS Security Policy in alert-only mode to understand your environment's DNS traffic patterns:
Priority: 100
Domain List: Threat Intelligence Feed
Action: Alert  ← Start here
Enabled: Yes
After 1-2 weeks of monitoring, switch to Block mode:
Priority: 100
Domain List: Threat Intelligence Feed
Action: Block  ← Enforce blocking
Enabled: Yes
2. Implement Layered Rules
Use multiple priority levels for different security zones:
Priority 100: Block Threat Intelligence Feed (highest priority)
Priority 200: Block High-Risk Categories (gambling, torrents, etc.)
Priority 300: Alert on Suspicious Patterns (e.g., rare TLDs)
Priority 400: Allow Approved Business Services (explicit allowlist)
Priority 65000: Log All Other Traffic (catch-all for visibility)
3. Enable Comprehensive Logging
Send logs to multiple destinations for different purposes:
- Log Analytics: Real-time querying and analysis
- Storage Account: Long-term retention for compliance (7+ years)
- Event Hubs: Stream to third-party SIEM (Splunk, QRadar, etc.)
4. Integrate with Azure Sentinel
Create automated responses to DNS security events:
// Azure Sentinel Analytics Rule: Detect high-volume DNS queries
AzureDiagnostics
| where Category == "DnsSecurityPolicy"
| summarize QueryCount = count() by SourceIP, DestinationDomain, bin(TimeGenerated, 5m)
| where QueryCount > 100
| extend Severity = "High"
| project TimeGenerated, SourceIP, DestinationDomain, QueryCount, Severity
Configure Sentinel playbooks to automatically isolate VMs that trigger this rule.
5. Test with Non-Production Environments First
Before applying policies to production VNets:
1. Deploy policy to dev/test VNet
2. Monitor for false positives
3. Adjust domain lists and rules
4. Validate application functionality
5. Roll out to production incrementally
6. Maintain an Allowlist for Business-Critical Services
Explicitly allow known-good domains to prevent accidental blocking:
Domain List: approved-business-services
├── api.salesforce.com
├── *.office365.com
├── *.azure.com
├── *.microsoft.com
└── trusted-partner-api.com

Priority: 300
Action: Allow
7. Regular Rule Audits
Quarterly, review:
- Blocked domains (are they still relevant?)
- Alert-only rules (should they be promoted to block?)
- Unused domain lists (can they be removed?)
- Rule priorities (are they still optimal?)
Monitoring & Alerting
Key Metrics to Track
1. Blocked Queries per Day: Trend analysis to detect attack campaigns
2. Top Blocked Domains: Identify most common threats targeting your environment
3. Top Source IPs Generating Blocks: Identify compromised resources
4. Alert-to-Block Ratio: Fine-tune rules based on false positive rate
5. DNS Query Volume: Detect anomalies (spikes may indicate DNS tunneling)
Sample KQL Queries
Query 1: Daily Blocked Query Trend
AzureDiagnostics
| where Category == "DnsSecurityPolicy"
| where Action == "Block"
| summarize BlockedCount = count() by bin(TimeGenerated, 1d)
| render timechart
Query 2: Top 10 Malicious Domains Blocked
AzureDiagnostics
| where Category == "DnsSecurityPolicy"
| where Action == "Block"
| summarize Count = count() by DestinationDomain
| order by Count desc
| take 10
Query 3: Identify Potentially Compromised Resources
AzureDiagnostics
| where Category == "DnsSecurityPolicy"
| where Action == "Block"
| summarize DistinctBlockedDomains = dcount(DestinationDomain), BlockedCount = count() by SourceIP
| where DistinctBlockedDomains > 5  // More than 5 different malicious domains
| order by BlockedCount desc
Query 4: DNS Tunneling Detection
AzureDiagnostics
| where Category == "DnsSecurityPolicy"
| summarize QueryCount = count() by SourceIP, DestinationDomain, bin(TimeGenerated, 1m)
| where QueryCount > 50
| project TimeGenerated, SourceIP, DestinationDomain, QueryCount
| order by QueryCount desc
Azure Sentinel Integration
Create an Analytics Rule to automatically respond to suspicious DNS activity:
// Rule: High Volume DNS Queries from Single Source
AzureDiagnostics
| where Category == "DnsSecurityPolicy"
| where TimeGenerated > ago(5m)
| summarize QueryCount = count() by SourceIP, bin(TimeGenerated, 5m)
| where QueryCount > 200
| extend AlertSeverity = "High"
| project TimeGenerated, SourceIP, QueryCount, AlertSeverity
Automated Response Playbook:
1. Alert triggers in Azure Sentinel
2. Logic App executes:
- Isolate VM by modifying NSG rules
- Create ServiceNow incident
- Send Teams notification to security team
- Snapshot VM disk for forensic analysis
Cost Considerations
Pricing Components
DNS Security Policy pricing includes:
1. Per-Policy Cost: ~$0.50 per policy per hour
2. Per-VNet Link Cost: ~$0.10 per VNet link per hour
3. DNS Query Processing: ~$0.40 per million queries
4. Logging Costs:
- Log Analytics ingestion: ~$2.50 per GB
- Storage Account archival: ~$0.02 per GB per month
Example Monthly Cost
Scenario: 3 VNets in one region, 10 million DNS queries/month
DNS Security Policy (1 policy): $0.50/hour × 730 hours = $365
VNet Links (3 VNets): $0.10/hour × 730 hours × 3 = $219
DNS Query Processing: 10M queries × $0.40/M = $4
Log Analytics (assume 50 GB/month): 50 GB × $2.50 = $125

Total Monthly Cost: ~$713
Cost Optimization Tips:
✅ Use one policy per region and link multiple VNets to it
✅ Configure log sampling for high-volume environments
✅ Archive logs to Storage Accounts (cheaper than Log Analytics) for long-term retention
✅ Use Azure Reservations for Log Analytics to save up to 50%
The Bigger Picture: DNS Security as Part of Defense in Depth
DNS Security Policy is one layer in a comprehensive Azure security strategy:
graph TD
    A[Azure Security Layers] --> B[Identity: Microsoft Entra ID]
    A --> C[Network: NSGs, Firewalls, ASG]
    A --> D[DNS: DNS Security Policy]
    A --> E[Application: WAF, DDoS Protection]
    A --> F[Data: Encryption, Key Vault]
    A --> G[Monitoring: Sentinel, Defender for Cloud]

    D --> H[Threat Intelligence Feed]
    D --> I[Custom Domain Lists]
    D --> J[DNS Logging]

    style D fill:#e1f5ff,stroke:#0078d4,stroke-width:3px
    style H fill:#c8e6c9,stroke:#388e3c,stroke-width:2px
Complementary Azure Security Services:
- Microsoft Defender for Cloud: Vulnerability management and security posture
- Azure Firewall: Layer 3-7 traffic filtering
- Azure DDoS Protection: Volumetric attack mitigation
- Microsoft Sentinel: SIEM and SOAR for automated response
- Azure Network Watcher: Network troubleshooting and diagnostics
- Microsoft Entra ID Protection: Identity-based threat detection
What You Need to Remember
DNS is where over 90% of attacks start. If you're not protecting this layer, you're leaving the front door wide open. Microsoft's Threat Intelligence feed gives you continuously updated protection against known malicious domains—completely managed by their security team, so you don't have to maintain blocklists yourself.
You get complete visibility into every DNS query from your Azure VNets, which is critical for both security analysis and compliance. The best part? It's a native Azure service, so you're not paying for third-party solutions or managing additional VM-based appliances. The threat feed updates automatically, works across all Azure regions, and integrates natively with tools you're probably already using like Azure Sentinel, Log Analytics, Event Hubs, and Storage Accounts.
The protection happens in real-time—malicious DNS queries get blocked before any connection can be established. That's the difference between stopping an attack at the door versus dealing with a compromise after the fact.
Resources
- Microsoft Learn: Azure DNS Security Policy Documentation
- Tech Community: Azure DNS Security Policy GA Announcement
- How-To Guide: Secure and View DNS Traffic
- Azure Portal: DNS Security Policies
- Microsoft Security Response Center: MSRC Homepage
Ready to protect your Azure environment at the DNS layer? Start by enabling DNS Security Policy in a non-production VNet, enable the Threat Intelligence feed in alert-only mode, and monitor for 1-2 weeks. Once you understand your DNS traffic patterns, switch to blocking mode and roll out to production.
The first line of defense against cyberattacks starts with DNS. Make sure yours is protected.
Over 90% of attacks begin with a DNS query. Stop them there.